
# LangGraph 使用案例
# 普通的langgraph案例
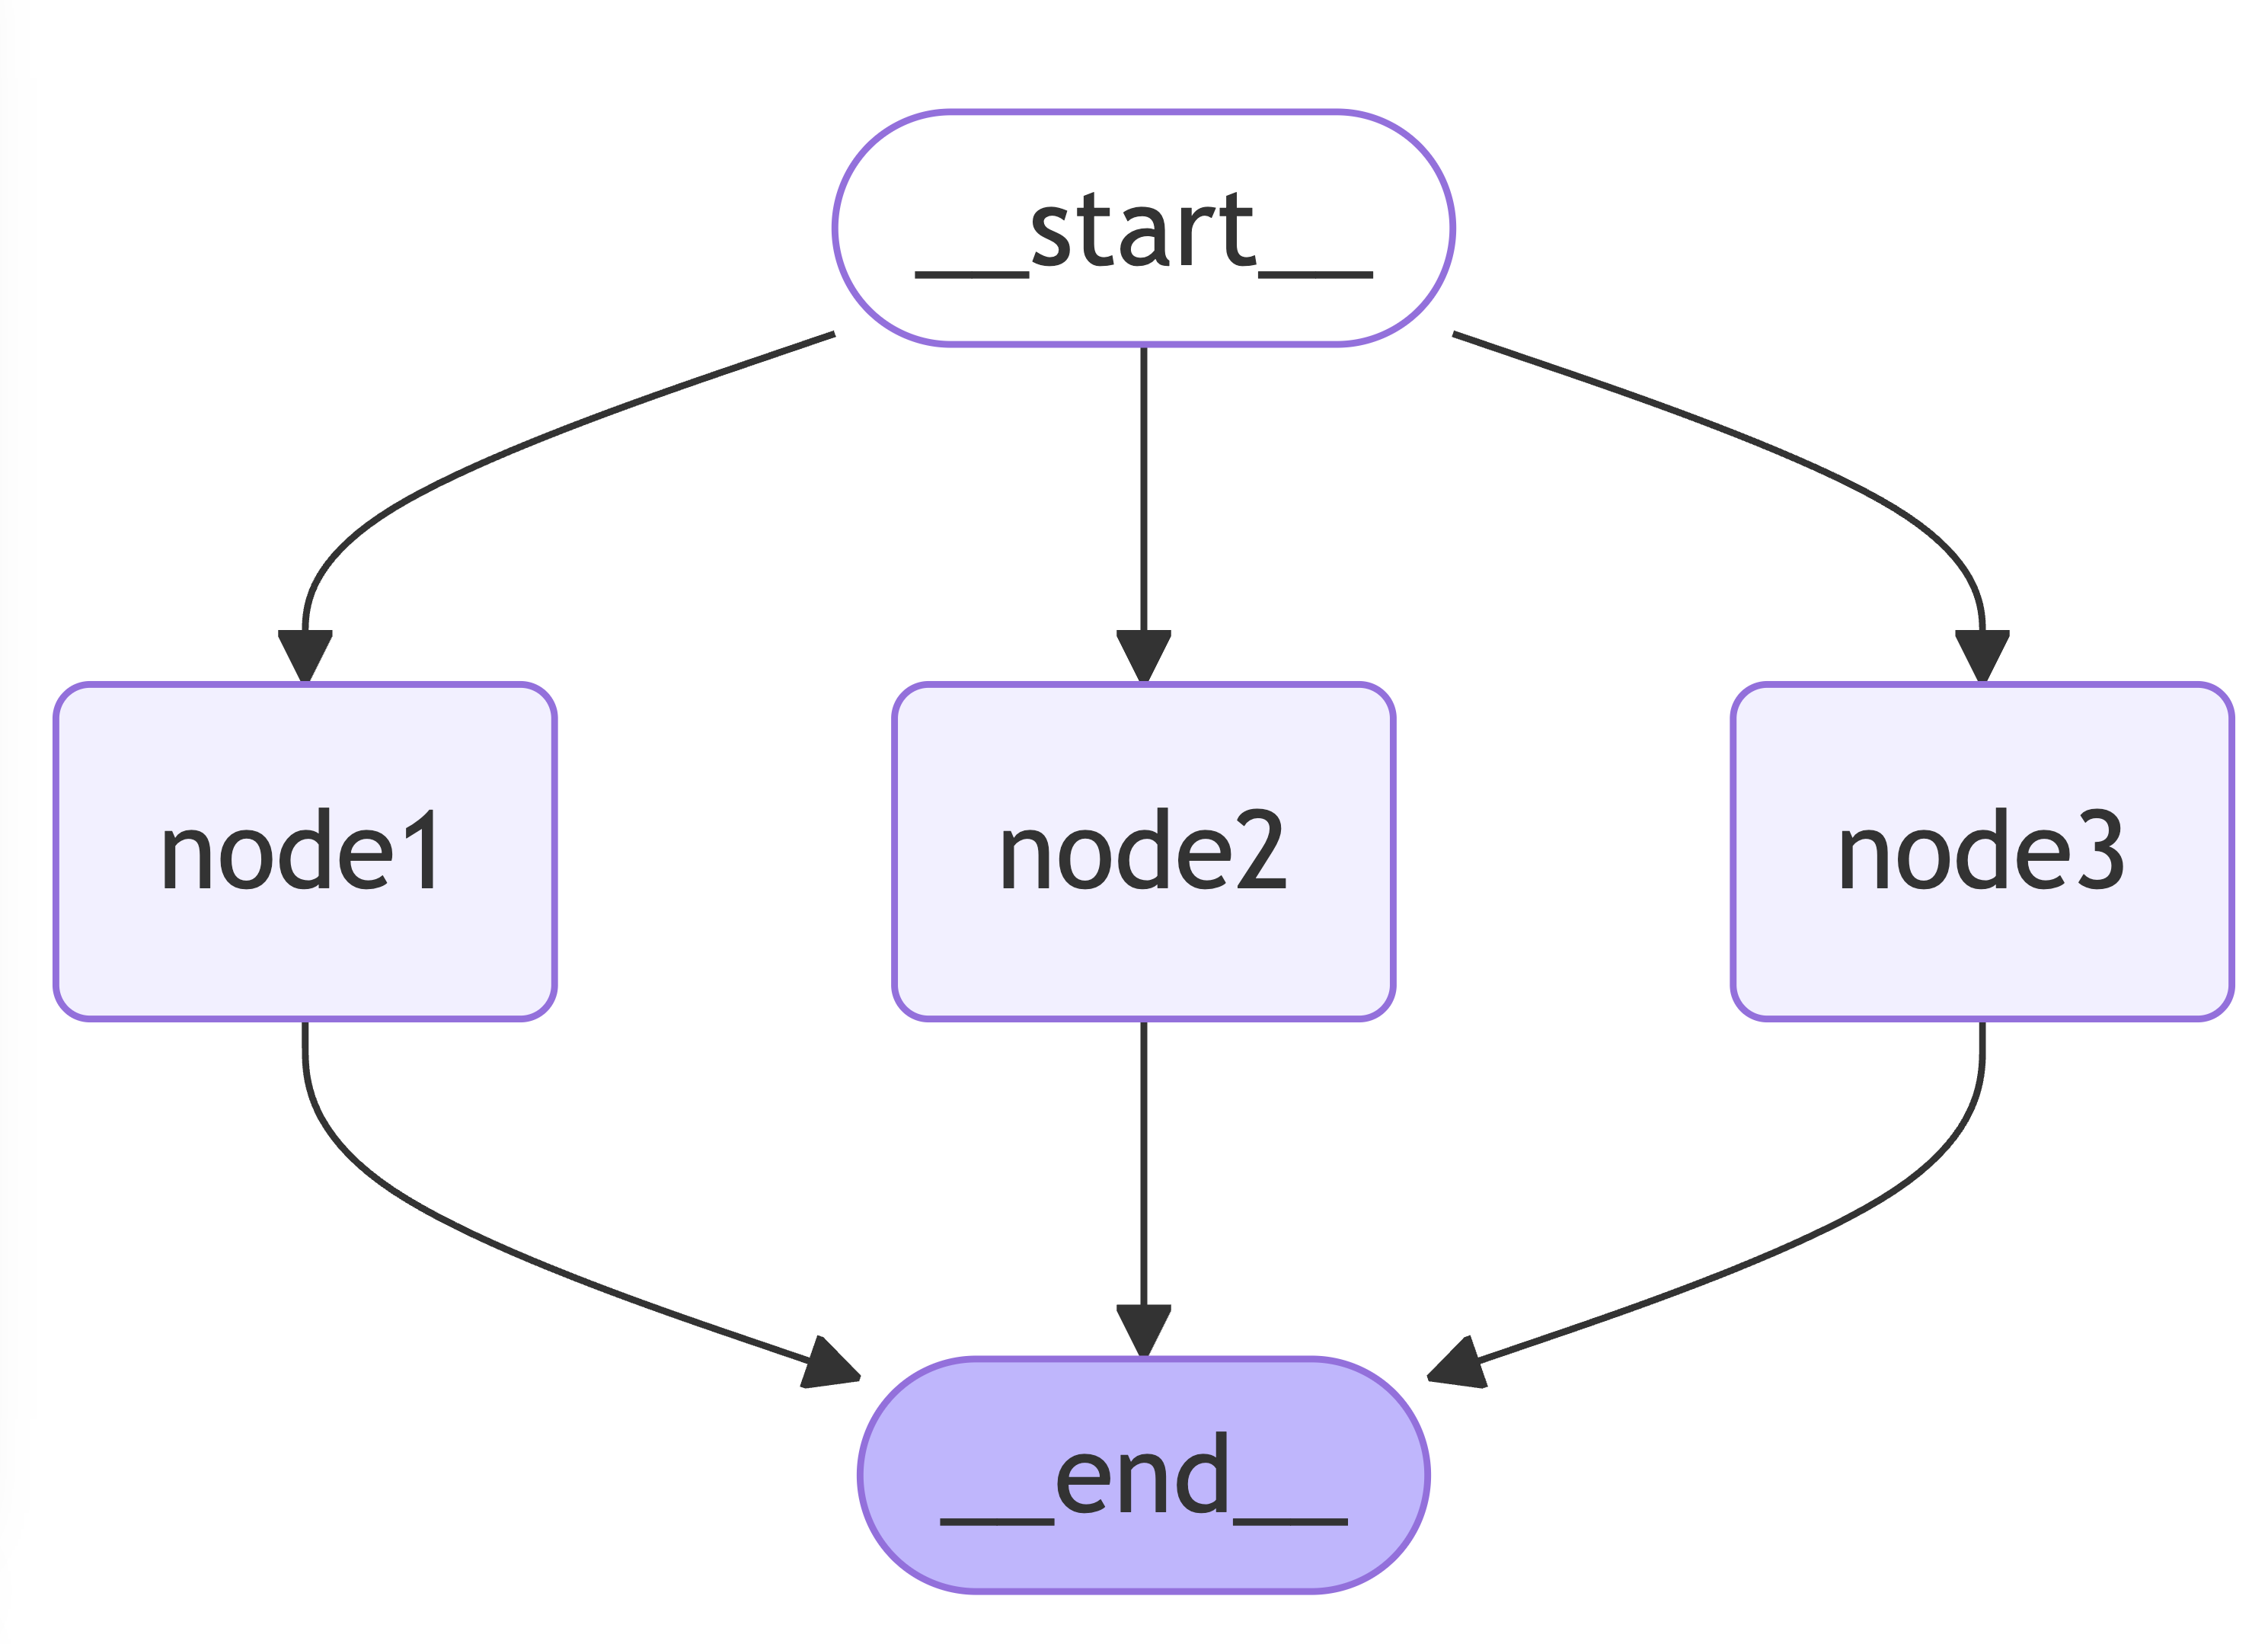
  // 定义 graph 的流程的数据结构:有一个 string[] 类型的 channel -> list
  // 默认值是空数组,state 更新的逻辑是数组拼接,但是去重
  const TestStateAnnotation = Annotation.Root({
    list: Annotation<string[]>({
      default: () => [],
      reducer: (current, updated) => {
        return Array.from(new Set(current.concat(updated)));
      }
    })
  });

  const graphBuilder = new StateGraph(TestStateAnnotation);
  const node1 = (_state: typeof TestStateAnnotation.State) => {
    return {
      list: ["a", "b", "cc"]
    };
  };

  const node2 = (_state: typeof TestStateAnnotation.State) => {
    return {
      list: ["cc", "ddd"]
    };
  };
  // 添加三个节点
  const node3Action = (_state: typeof TestStateAnnotation.State) => {
    return {
      list: ["a", "ee"],
      name: 222 // 注意这里多返回了一个 222
    };
  };
  graphBuilder.addNode("node1", node1);
  graphBuilder.addNode("node2", node2);
  graphBuilder.addNode("node3", node3Action);
  graphBuilder.addEdge(START, "node1");
  graphBuilder.addEdge(START, "node2");
  graphBuilder.addEdge(START, "node3");
  graphBuilder.addEdge("node1", END);
  graphBuilder.addEdge("node2", END);
  graphBuilder.addEdge("node3", END);
# 条件分支
addConditionalEdges(source, routingFunction, pathMap?): this
- source: 源节点
- routingFunction: 路由函数,根据返回值决定流向
- pathMap: 可选,用于明确 routingFunction 每个返回值的流向,不指定则默认增加一个 end 的边
pathMap 可以是一个 string map 或者 string[],如果是 string map,则表示node 的 map 结构,否则如果是一个数组类型,代表当前条件路由允许到达的节点。
# 条件edge 的langgraph案例
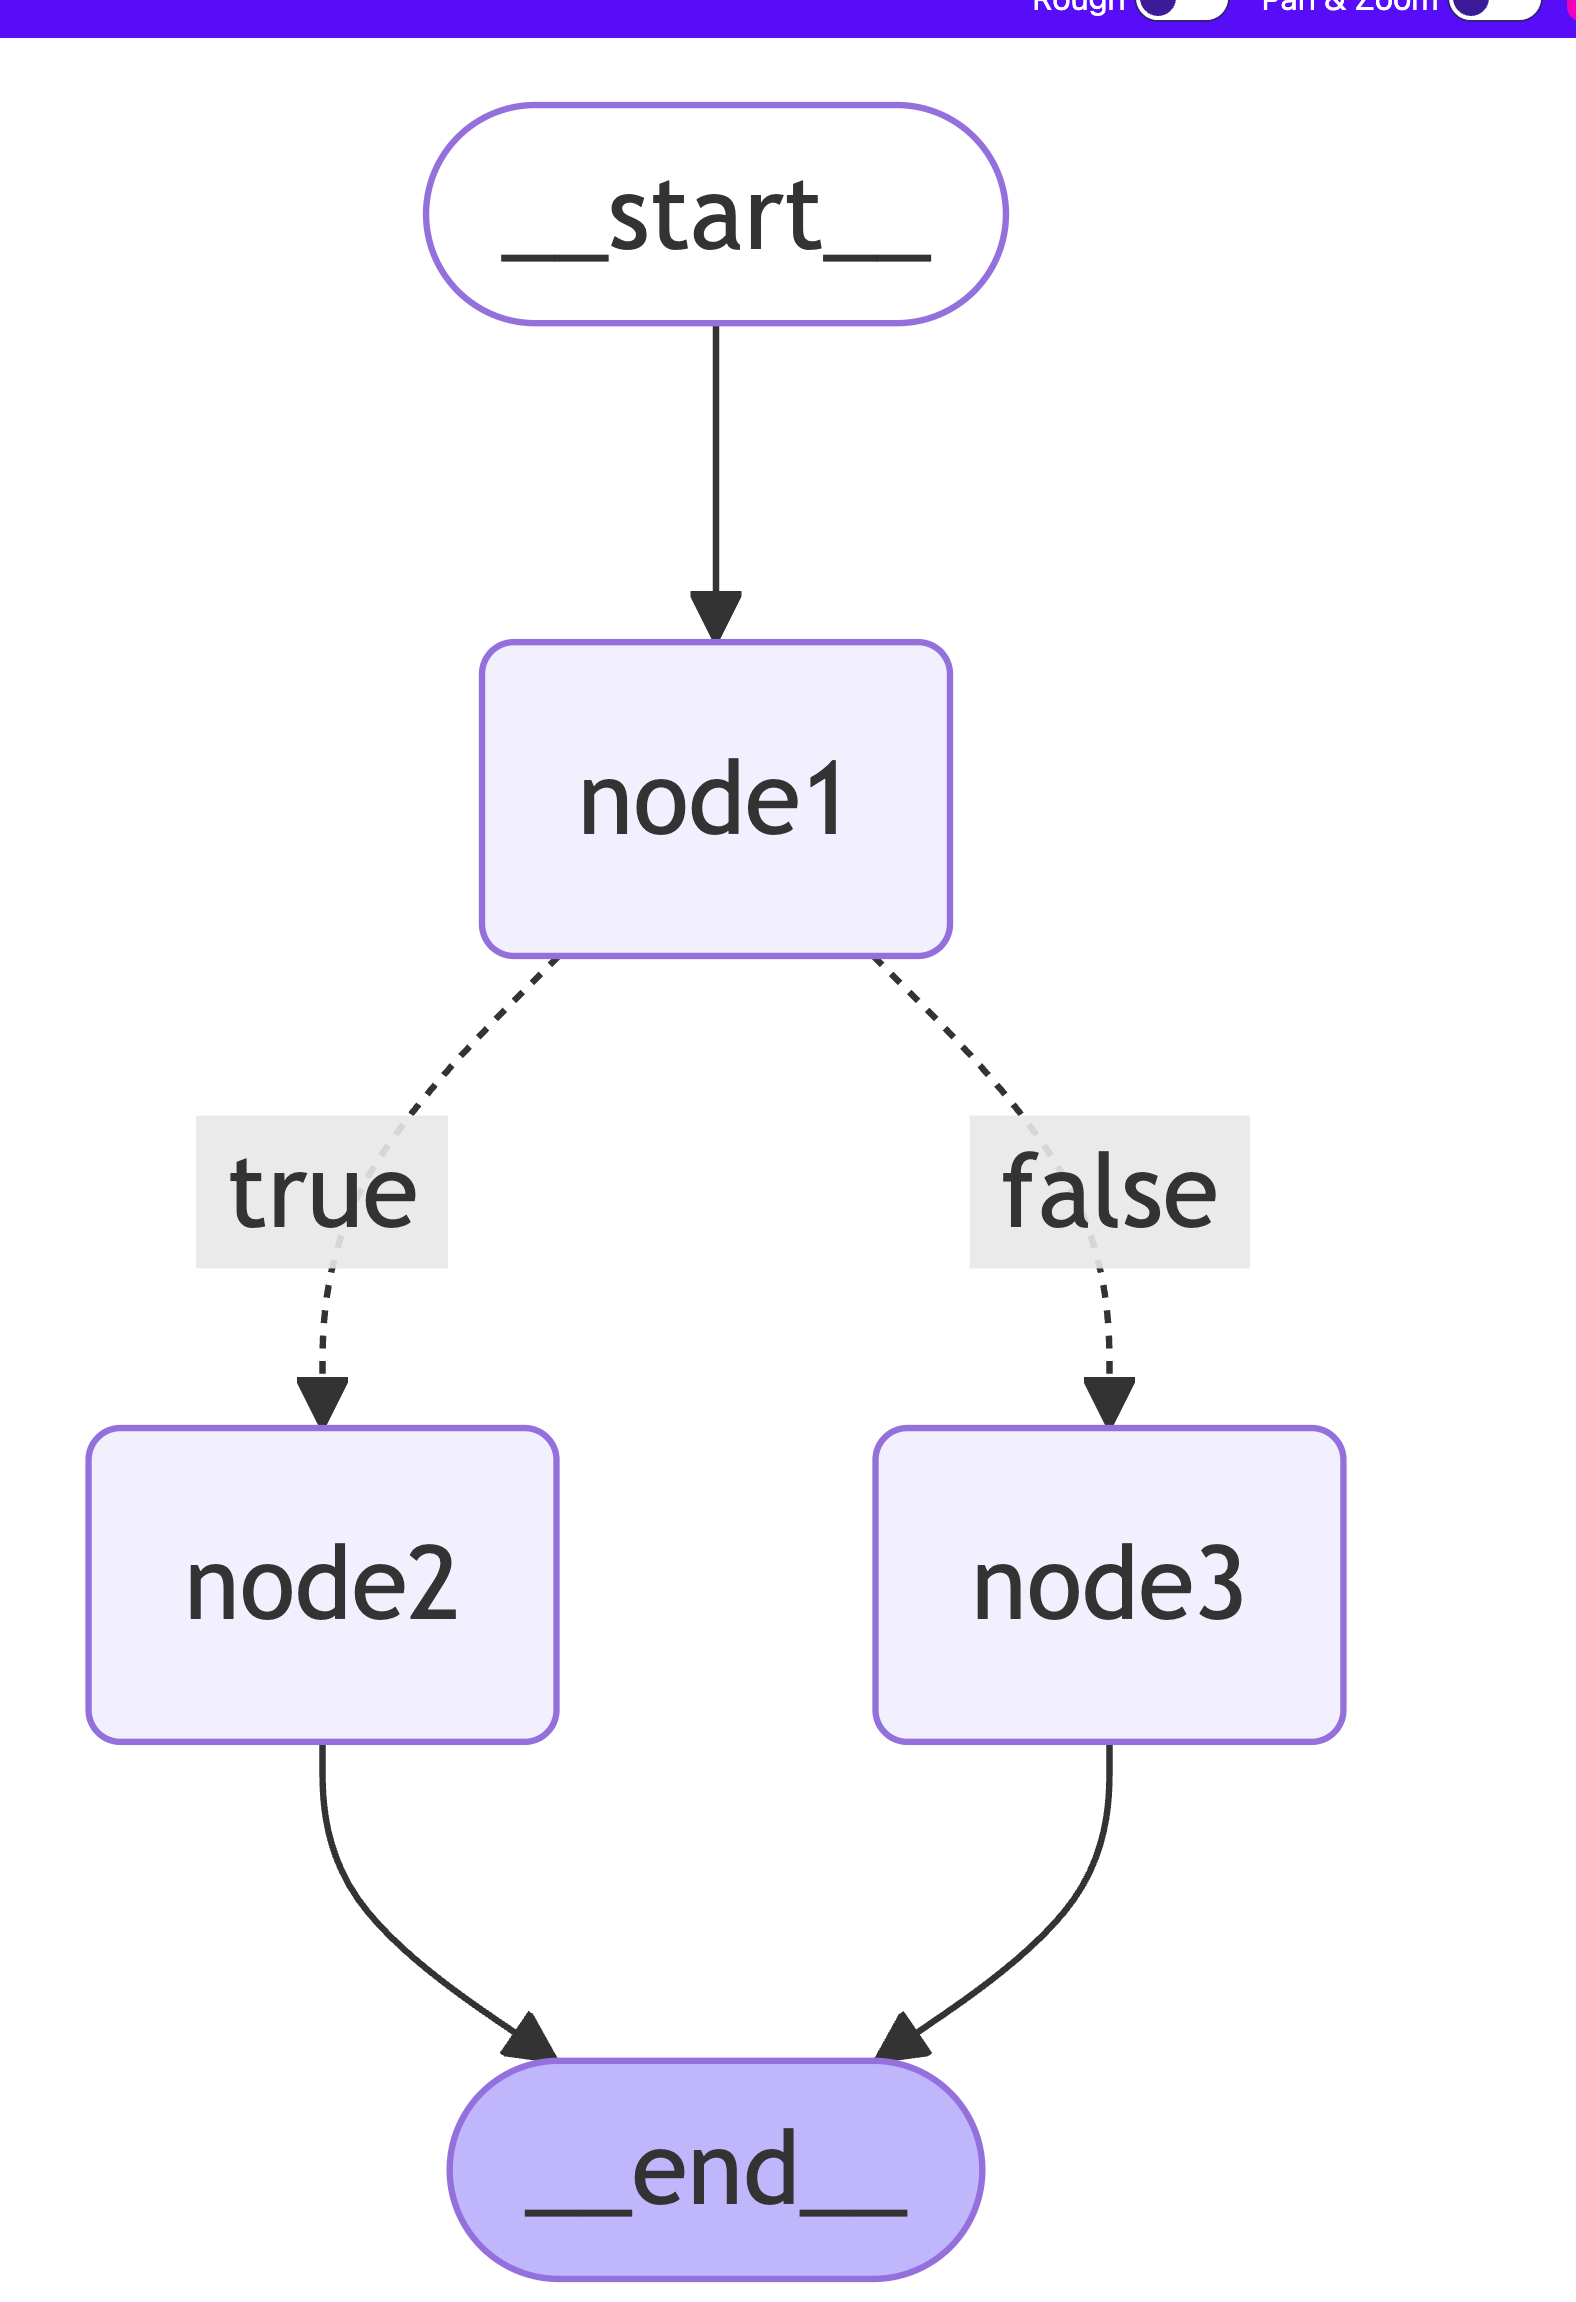
如果没有通过 pathMap 明确 routingFunction 每个返回值的流向,LG 会默认为条件分支增加一个 end 的边。
  // 如果没有通过 pathMap 明确 routingFunction 每个返回值的流向,LG 会默认为条件分支增加一个 __end__ 的边。
  const condition = (state: typeof TestStateAnnotation.State) => {
    // 一个模拟条件,假设存在a了就走node2,否则走node3
    if (state.list.includes("a")) {
      return "node2";
    } else {
      return "node3";
    }
  };

  graphBuilder.addNode("node1", node1);
  graphBuilder.addNode("node2", node2);
  graphBuilder.addNode("node3", node3Action);

  graphBuilder.addEdge(START, "node1");
  graphBuilder.addConditionalEdges("node1", condition, {
    node2: "node2",
    node3: "node3"
  });
  graphBuilder.addEdge("node2", END);
  graphBuilder.addEdge("node3", END);
# 条件edge + 并行节点 的langgraph案例
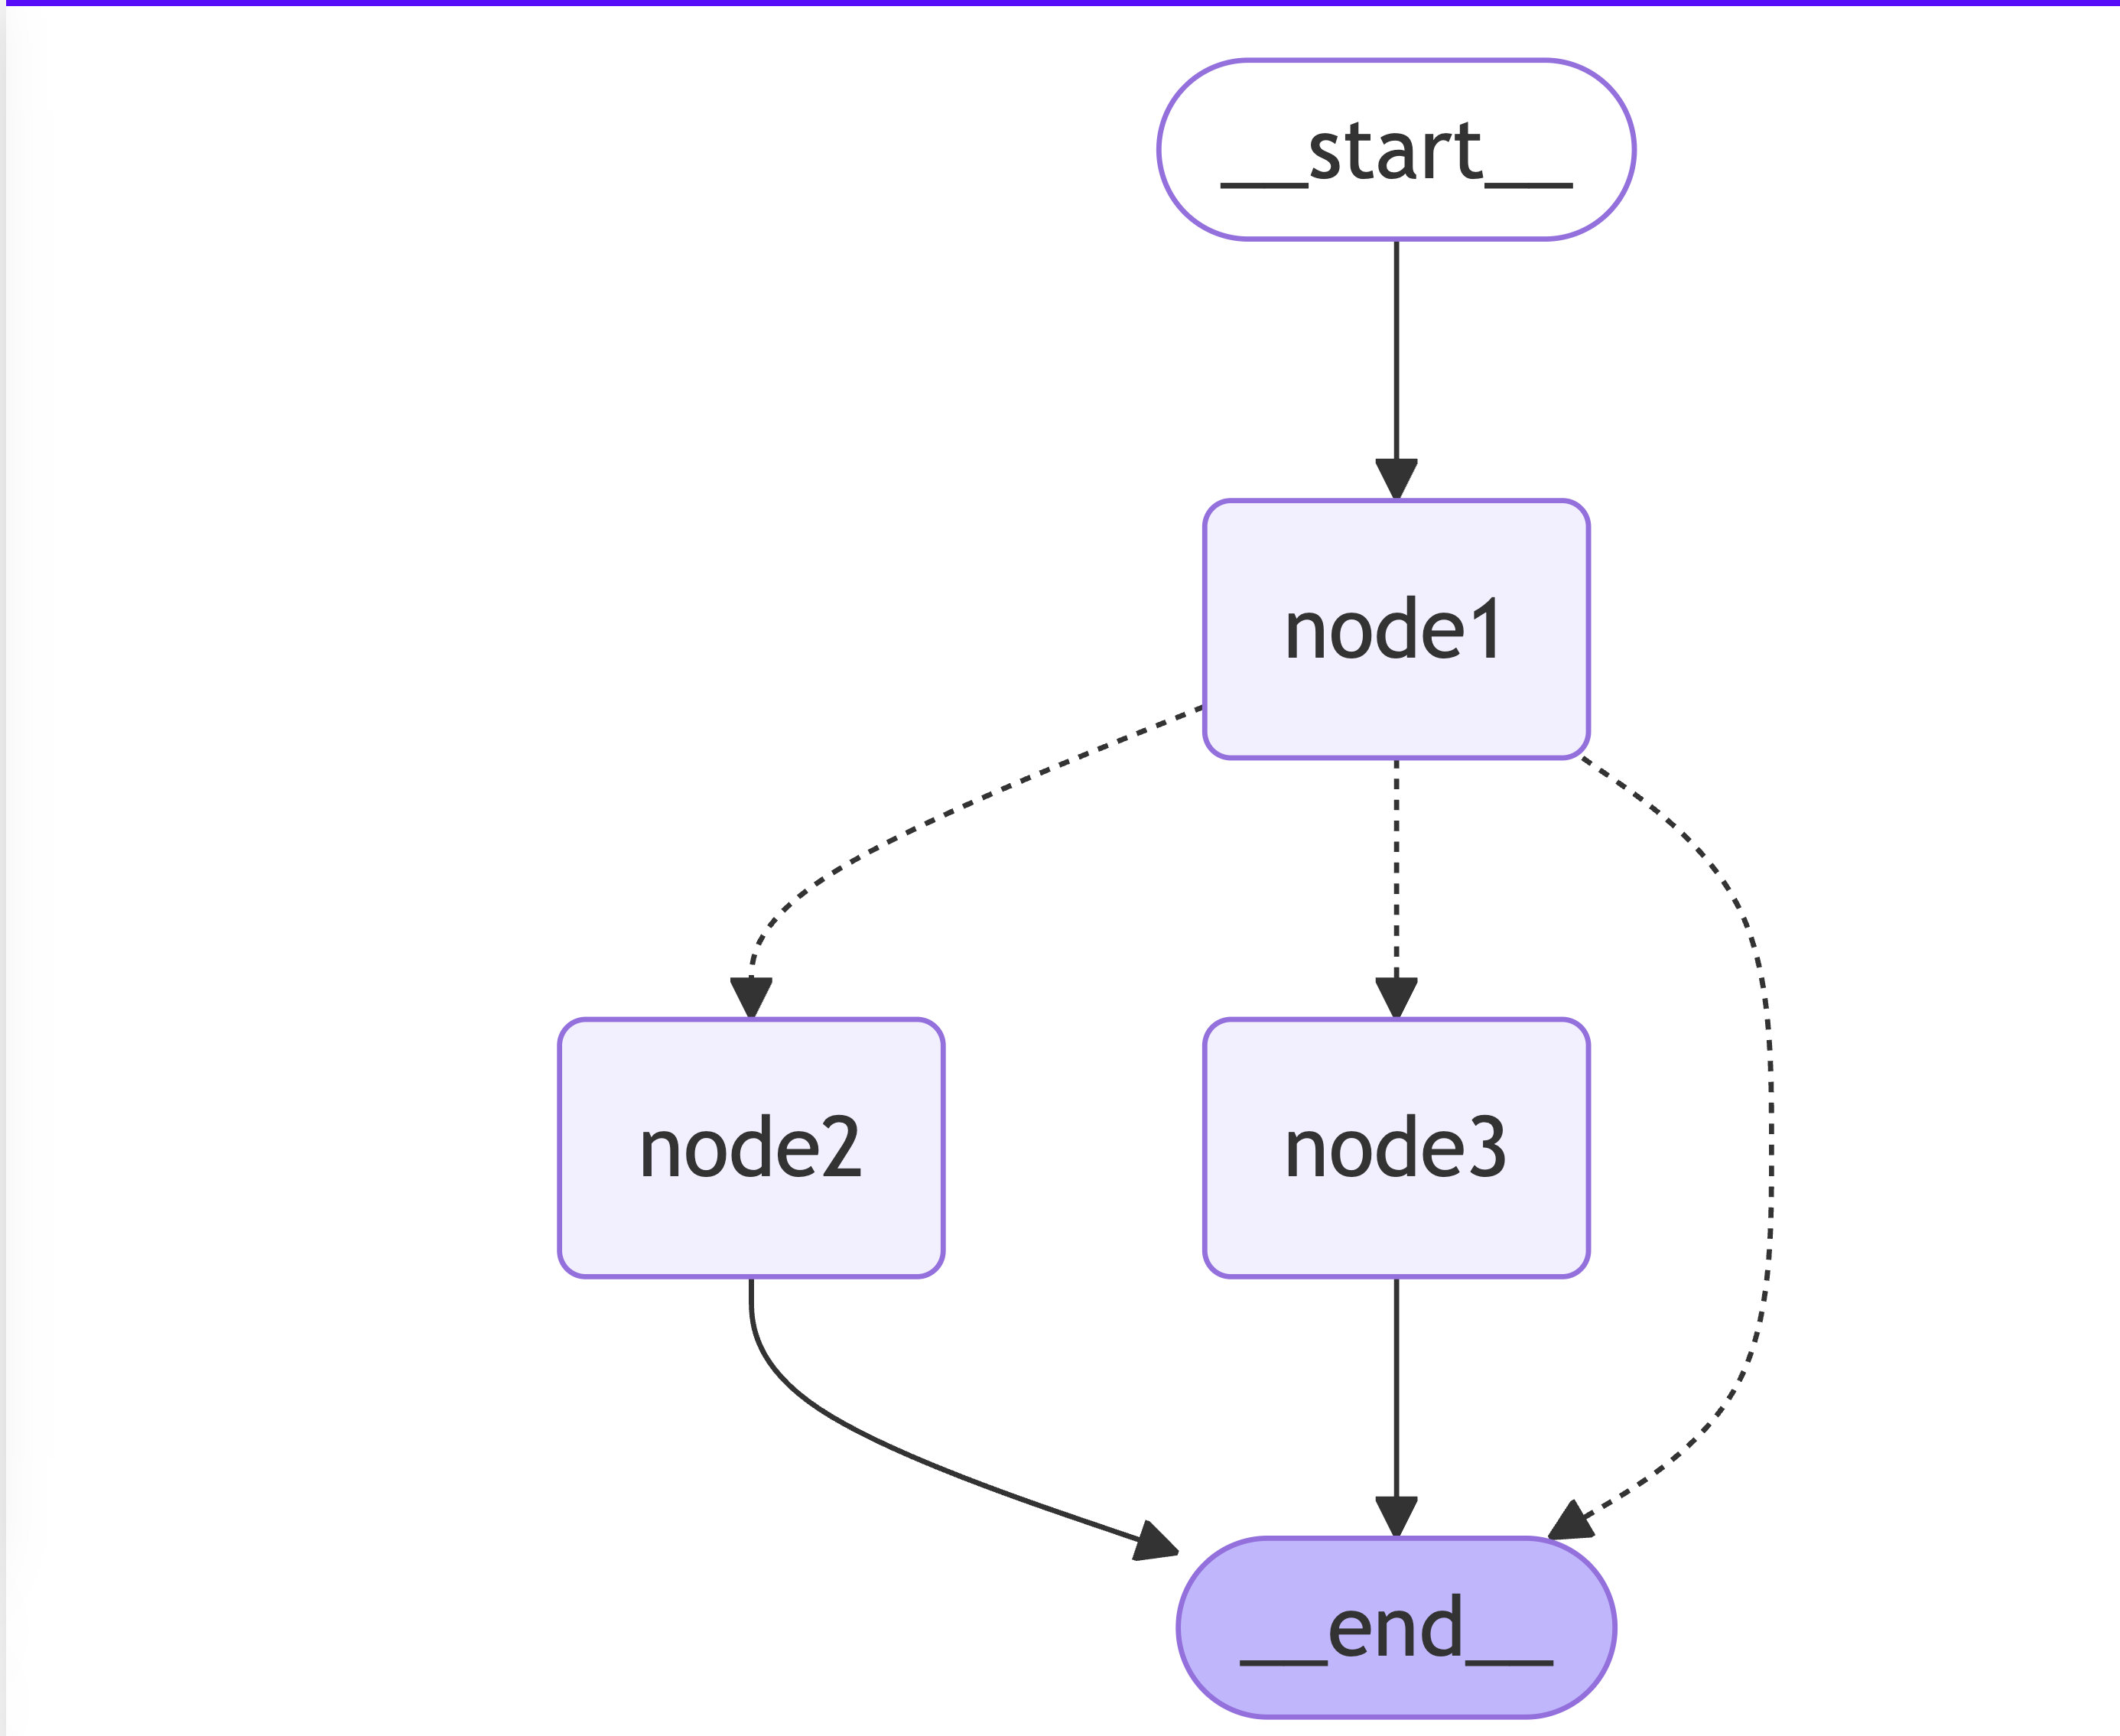
如果没有通过 pathMap 明确 routingFunction 每个返回值的流向,LG 会默认为条件分支增加一个 end 的边。
  const condition = (state: typeof TestStateAnnotation.State) => {
    if (state.list.includes("a")) {
      return END;
    } else {
      return ["node2", "node3"];
    }
  };

  graphBuilder.addNode("node1", node1);
  graphBuilder.addNode("node2", node2);
  graphBuilder.addNode("node3", node3Action);

  graphBuilder.addEdge(START, "node1");
  graphBuilder.addConditionalEdges("node1", condition);
  graphBuilder.addEdge("node2", END);
  graphBuilder.addEdge("node3", END);
# 并行、循环节点
在 前面的代码 中,我们可以基于 addConditionalEdges() 方法,辅助我们实现并行任务的能力,我们已经实现了简单的并行任务
  const condition = (state: typeof TestStateAnnotation.State) => {
    if (state.list.includes("a")) {
      return END;
    } else {
      return ["node2", "node3"];
    }
  };
但是此时我们只能固定 node2 和 node3 一起执行,无法动态的复用多个节点,而且这个过程也不是可循环的(这里循环是指多次执行同一个节点)。
# 利用 Send 实现并行
Send 在 LG 中是一个 Class,我们可以实例化,并且构造函数很简单:
- node:要路由到哪个节点
- args:路由到节点时,传递给节点的参数是什么(可以传入整个 state 也可以传入独立的参数)
我们想要实现的效果:
- 输入:["langgraph"]
- 输出:{"langgraph": ['l', 'a', 'n', 'g', 'g', 'r', 'a', 'p', 'h']}
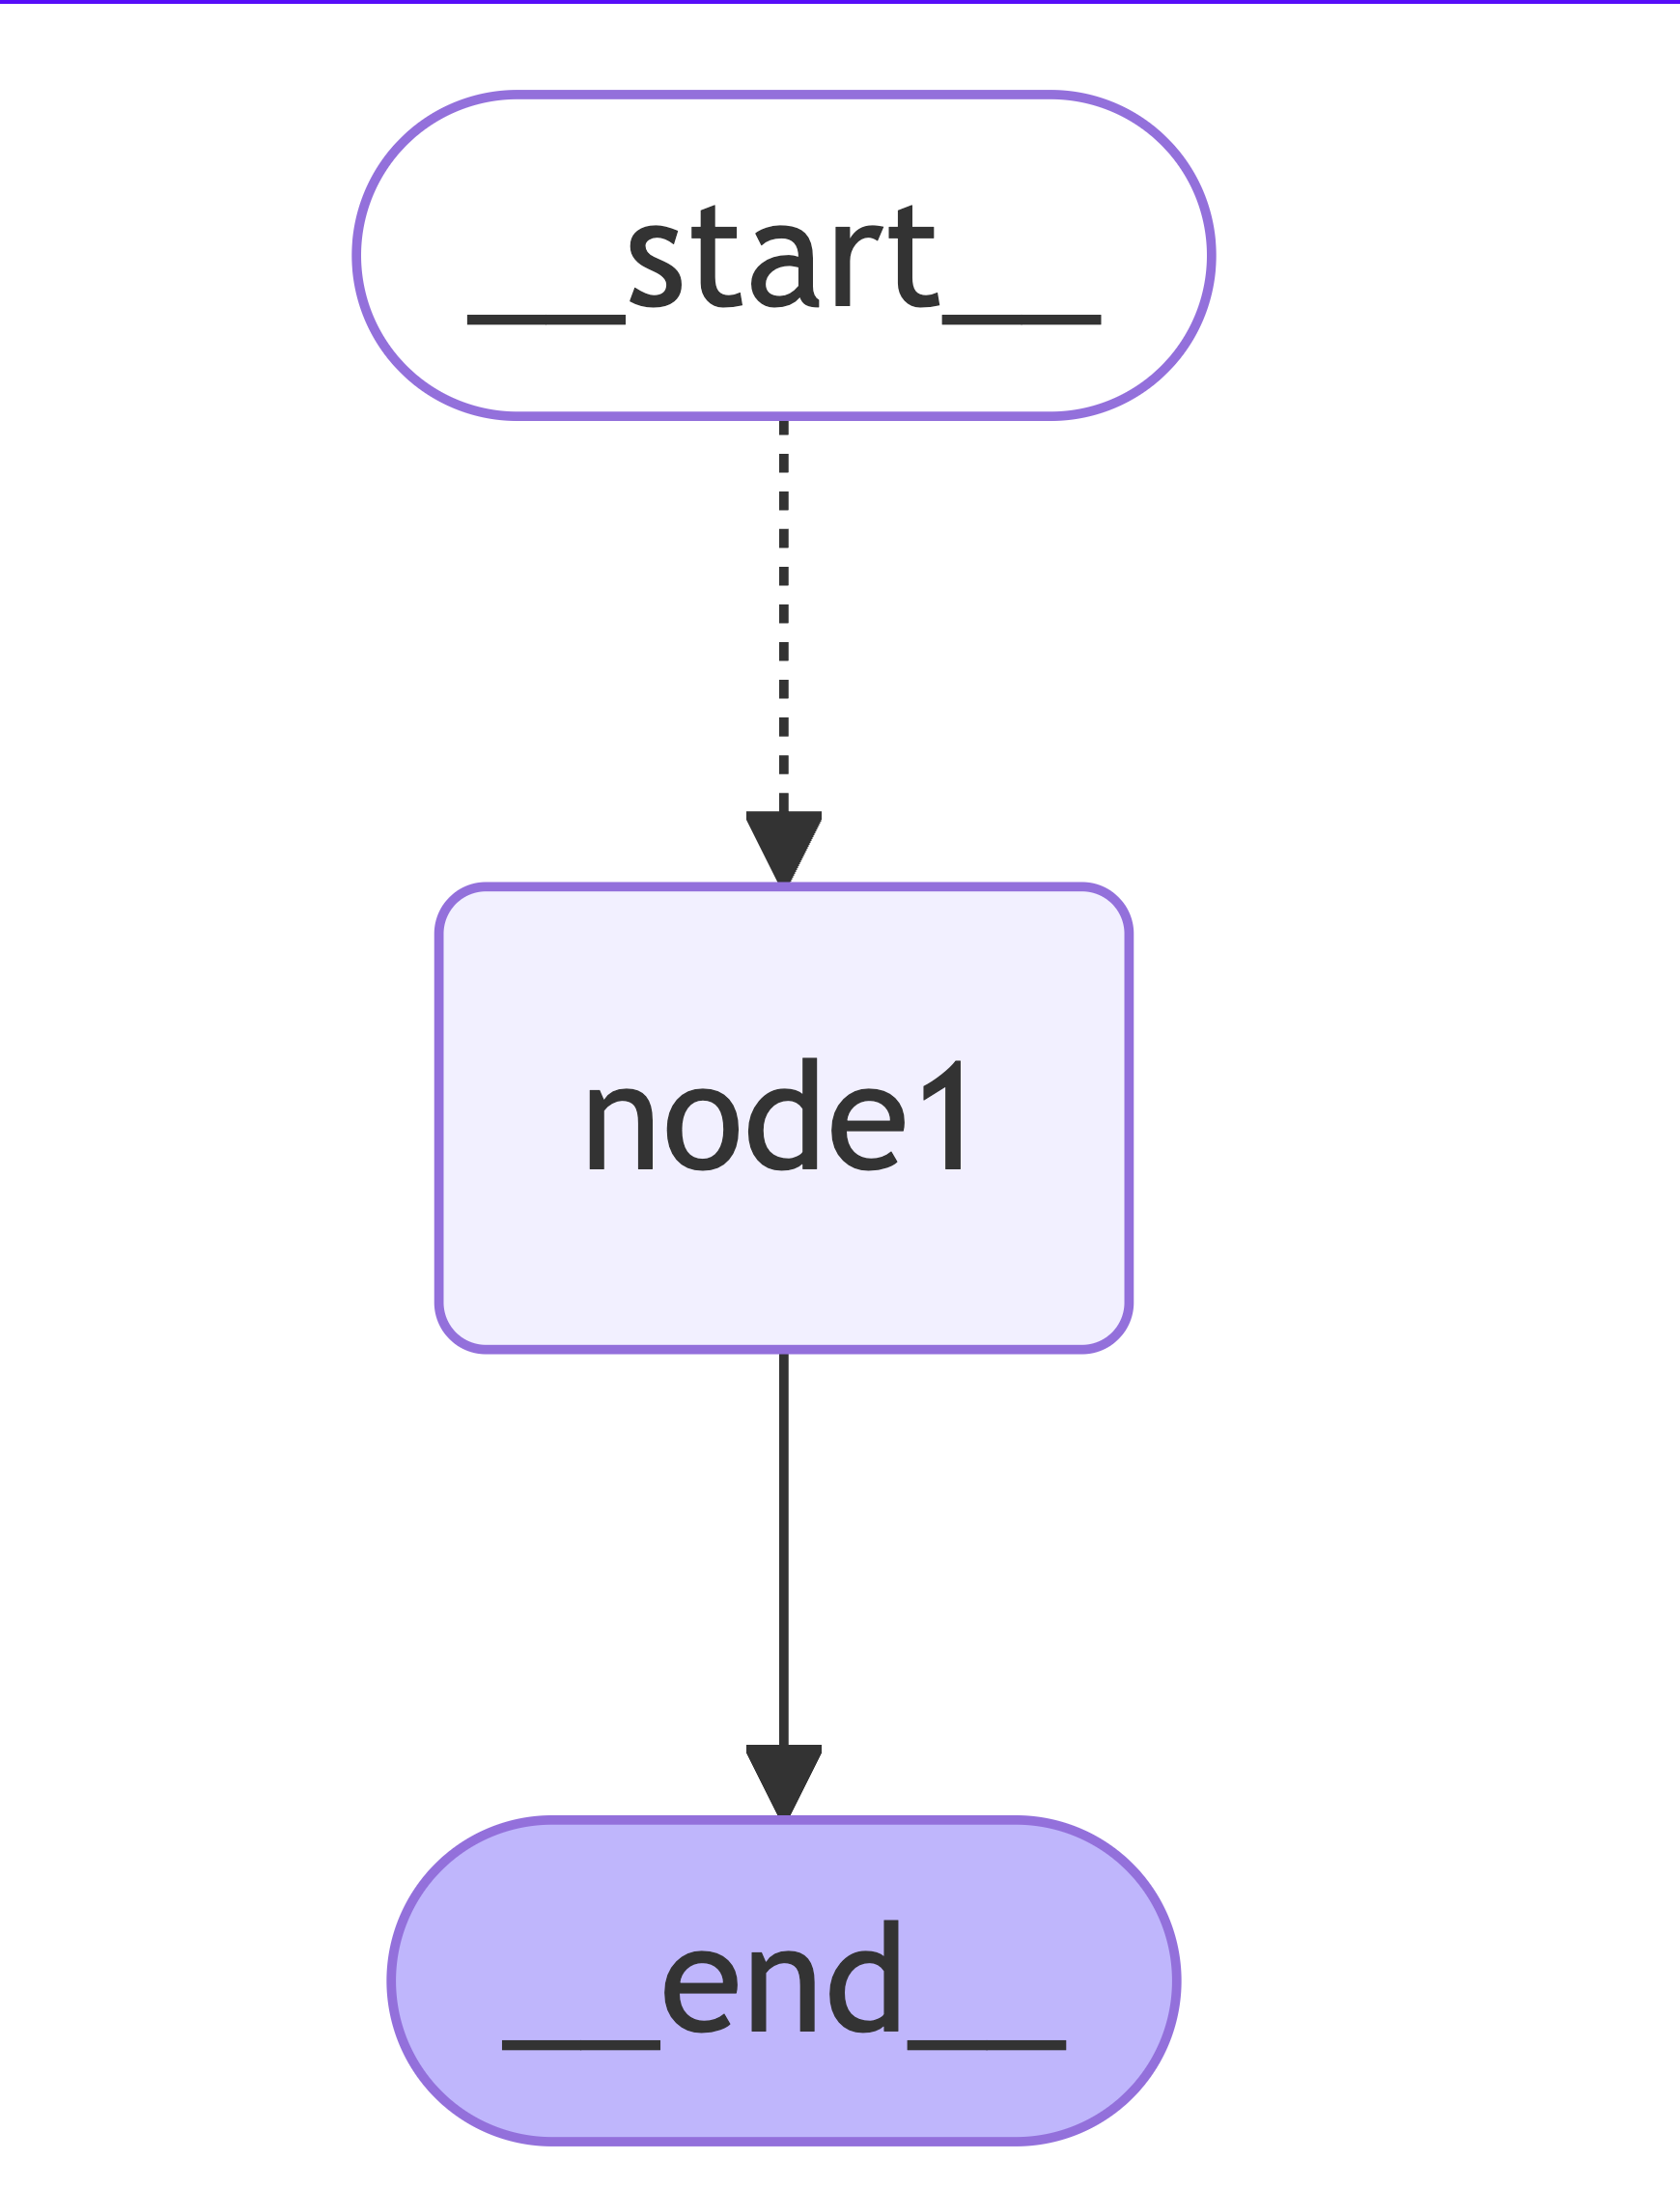
整体思路:动态创建 N 个 edge,路由到【字符串处理】(如下面的Node1)这个节点上,并行执行,然后收集结果;(并行)
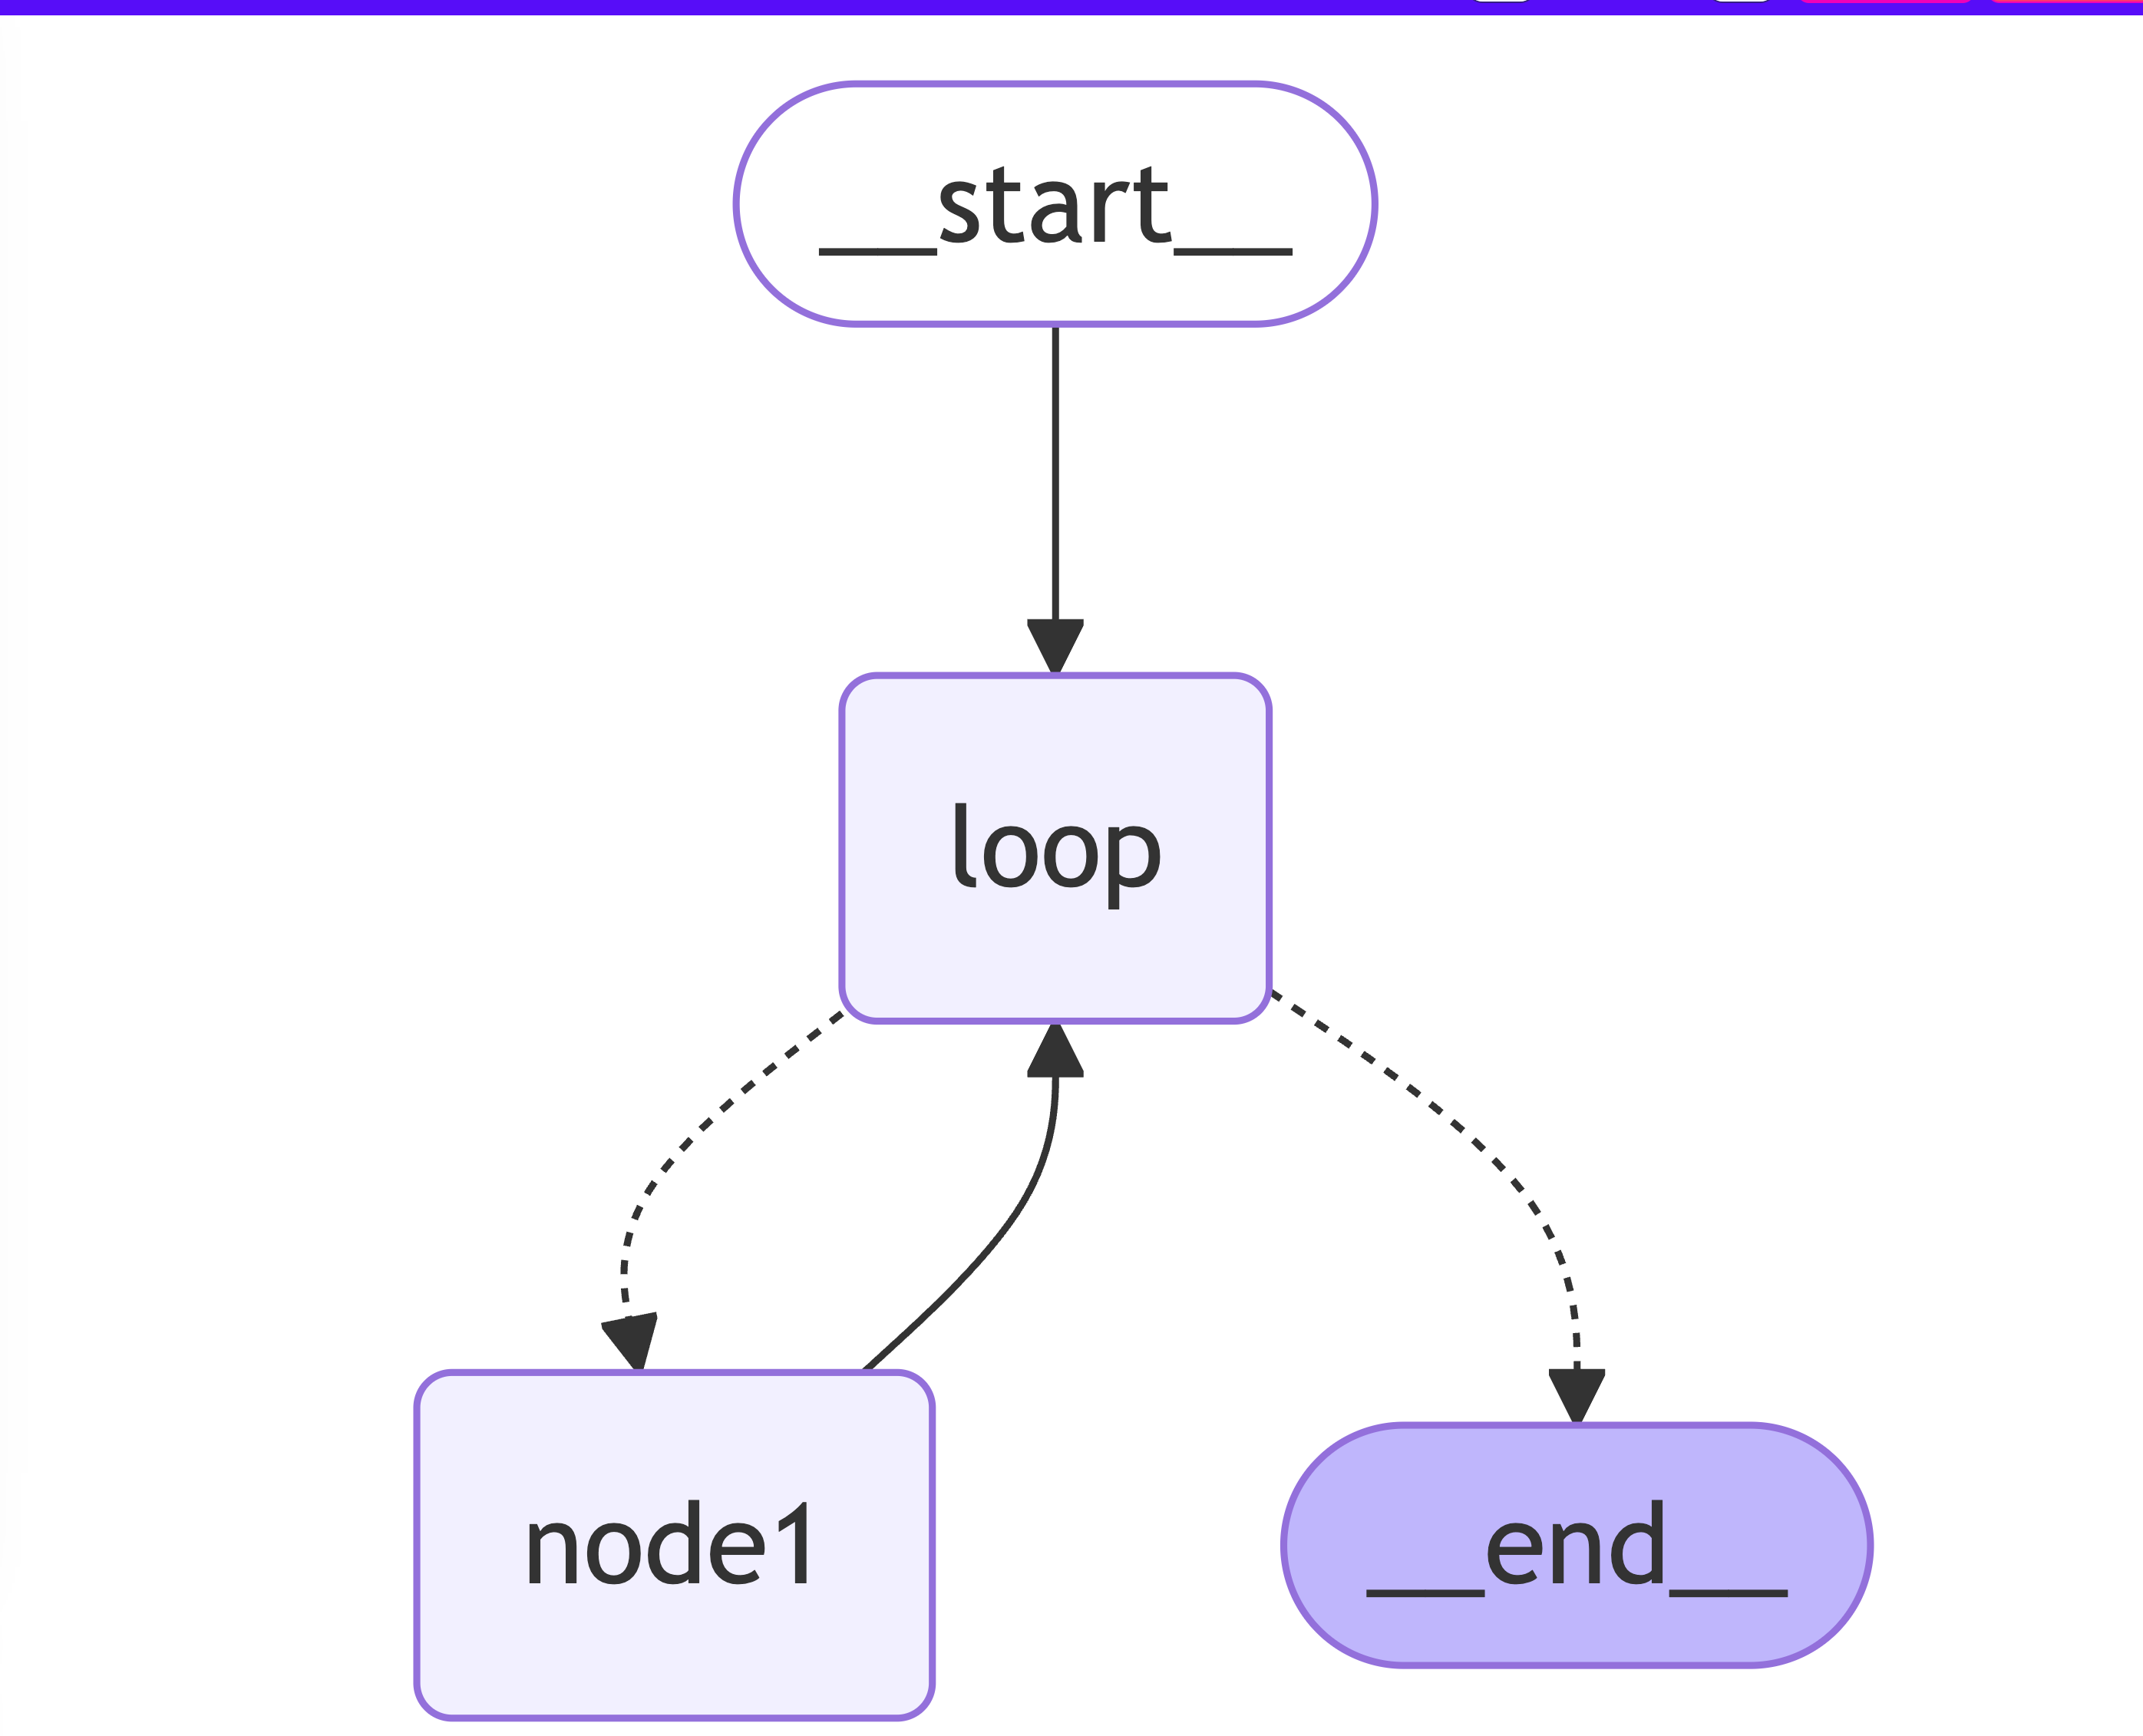
我们观察流程图,虽然只有一条线 start -> node1 -> end , 但是我们知道这个过程中 node1 会并行的执行 N 次。
  const nodeAction = (str: string) => {
        // 因为 node1 每次返回的 State 类型是是 { output : Record<string, string[]> },可以通过我们的 reducer 直接合并成最终的结果
    return {
      output: { [str]: Array.from(str) }
    };
  };
  const condition = (state: typeof TestStateAnnotation.State) => {
    const { inputList } = state;
    // 创建多个节点
    return inputList.map(item => new Send("node1", item));
  };

  graphBuilder.addNode("node1", nodeAction);
  graphBuilder.addConditionalEdges(START, condition, ["node1"]);
  graphBuilder.addEdge("node1", END);
# 利用 Send 实现循环
我们想要实现的效果:
- 输入:["langgraph"]
- 输出:{"langgraph": ['l', 'a', 'n', 'g', 'g', 'r', 'a', 'p', 'h']}
整体思路:非并行循环:我们再输入 state 之后,将 state 传递到节点,节点自己循环自己,最终完成任务,输出结果;(非并行,无法利用现有的 node,因为现有的 node 只接受 string 入参)
流程中循环的实现其实就是一个节点执行完成后,重新回到某个起点,然后通过某个条件判断是否要结束,转到另外一个节点
注意
- Send 不允许直接指向 end 节点
- Send 不允许直接指向 start 节点
  const nodeAction = (str: string) => {
    // 并且因为 node1 每次返回的 State 类型是是 { output : Record<string, string[]> },可以通过我们的 reducer 直接合并成最终的结果。
    return {
      output: { [str]: Array.from(str) }
    };
  };
  const loopNode = (state: typeof TestStateAnnotation.State) => {
    return state;
  };
  const condition = (state: typeof TestStateAnnotation.State) => {
    const { inputList } = state;
    const first = inputList.shift();
    if (!first) {
      return END;
    }

    return new Send('node1', first);
  };

  graphBuilder
  .addNode('node1', nodeAction)
  .addNode('loop', loopNode)
  .addEdge(START, 'loop')
  .addConditionalEdges('loop', condition, ['node1', END])
  .addEdge('node1', 'loop');
# State 的修改
我们声明的 State 会在流程的各个节点流转,每个节点都可以进行 state 更改,我们通过 reducer 决定数据更改的方式,默认的 state 会通过覆盖的方式不断被修改。
# State 的合并
当业务应用复杂的时候,我们可能会有多个 Annotation.Root 声明的 State,或者我们希望复用某些 State Annotation,LG 支持我们通过state 的 spec 属性进行合并。 下面的示例中,我们新增了一个 AnotherStateAnnotation 然后我们将前面的 StateAnnotation 和 AnotherStateAnnotation 合并成一个新的 mergedStateAnnotation。
const AnotherStateAnnotation = Annotation.Root({
  title: Annotation<string>,
});

const mergedStateAnnotation = Annotation.Root({
  ...StateAnnotation.spec,
  ...AnotherStateAnnotation.spec,
});
# State 自动忽略
通过 Annotation.Root 声明了 State 之后,得到三个属性(channel):name、list、age 意味着我们可以在流程中修改这3个属性的值,因为每个属性是一个 channel,因此当 state 输入到节点中时:
- 如果节点只修改了其中某个属性,其他的属性会保持不变,不会丢失;
- 如果节点修改了没有在 Annotation.Root 中声明的属性,则不会生效
参考下面案例:
const StateAnnotation = Annotation.Root({
  name: Annotation<string>,
  list: Annotation<Record<string, string[]>>({
    reducer: (current, updated) => ({ ...current, ...updated }),
  }),
  age: Annotation<number>({
    default: () => 1,
    reducer: current => current + 1,
  }),
});

const graphBuilder = new StateGraph(StateAnnotation);

const nodeAction = () => {
  return {
    name: 'node1',
    title: 'not existed channel',
  };
};

graphBuilder.addNode('node1', nodeAction).addEdge(START, 'node1').addEdge('node1', END);

const graph = await graphBuilder.compile();

const res = await graph.invoke({ list: ['xxx'] });
- list 和 age我们没有在 node1 节点中返回,么有处理,因此保持不变;
- name 是 node1 赋值的
- title 虽然 node1 返回了,但是我们没有声明这个 channel,因此结果中也不会存在这个属性
# 输出输出使用不同State
const InAnnotation = Annotation.Root({
  question: Annotation<string>,
});

const OutAnnotation = Annotation.Root({
  answer: Annotation<string>,
});
// 使用不同的 State
const graphBuilder = new StateGraph({
  input: InAnnotation,
  output: OutAnnotation,
});

const nodeAction = (state: typeof InAnnotation.State) => {
  this.logger.info('state', state);
  return {
    answer: 'my name is zhanwen li',
    duration: 3000,
    question: state.question,
  };
};

graphBuilder.addNode('node1', nodeAction).addEdge(START, 'node1').addEdge('node1', END);

const graph = await graphBuilder.compile();

const res = await graph.invoke({ question: "what's your name?", user: 'zhanwen' });
上面的代码输出为 {"answer": 'my name is zhanwen li'}
# 总结
LangGraph 流程的 state 设计中,所有的 state 属性都会变成一个 channel,任何节点都能通过 channel 修改 state 的值。 一个节点只能读取通过 Annotation.Root 声明过的 state channel,如果某个 channel 没有声明,则 node 节点无法直接读取值,但仍然可以修改它。
# 使用 ToolNode + Agent 实现简单的天气查询
ToolNode 是 LangGraph 中一种特殊的节点,用来帮助我们集合 tool calling 实现第三方服务集成,构建 Agent 应用。 在基于 LangGraph 实现的应用中,ToolNode 帮助我们衔接 模型决策与动作执行
- 意图识别:ToolNode 会读取 LLM tool calling 后返回的消息(AIMessage),消息中会包含 tool calling 的结论和参数提取; 根据 tool 的描述,决定调用哪个 tool(可能有 N 个tool)
- 参数提取:ToolNode 基于提供的工具列表,实际上触发工具的 invoke 方法,并且传入模型提取的参数
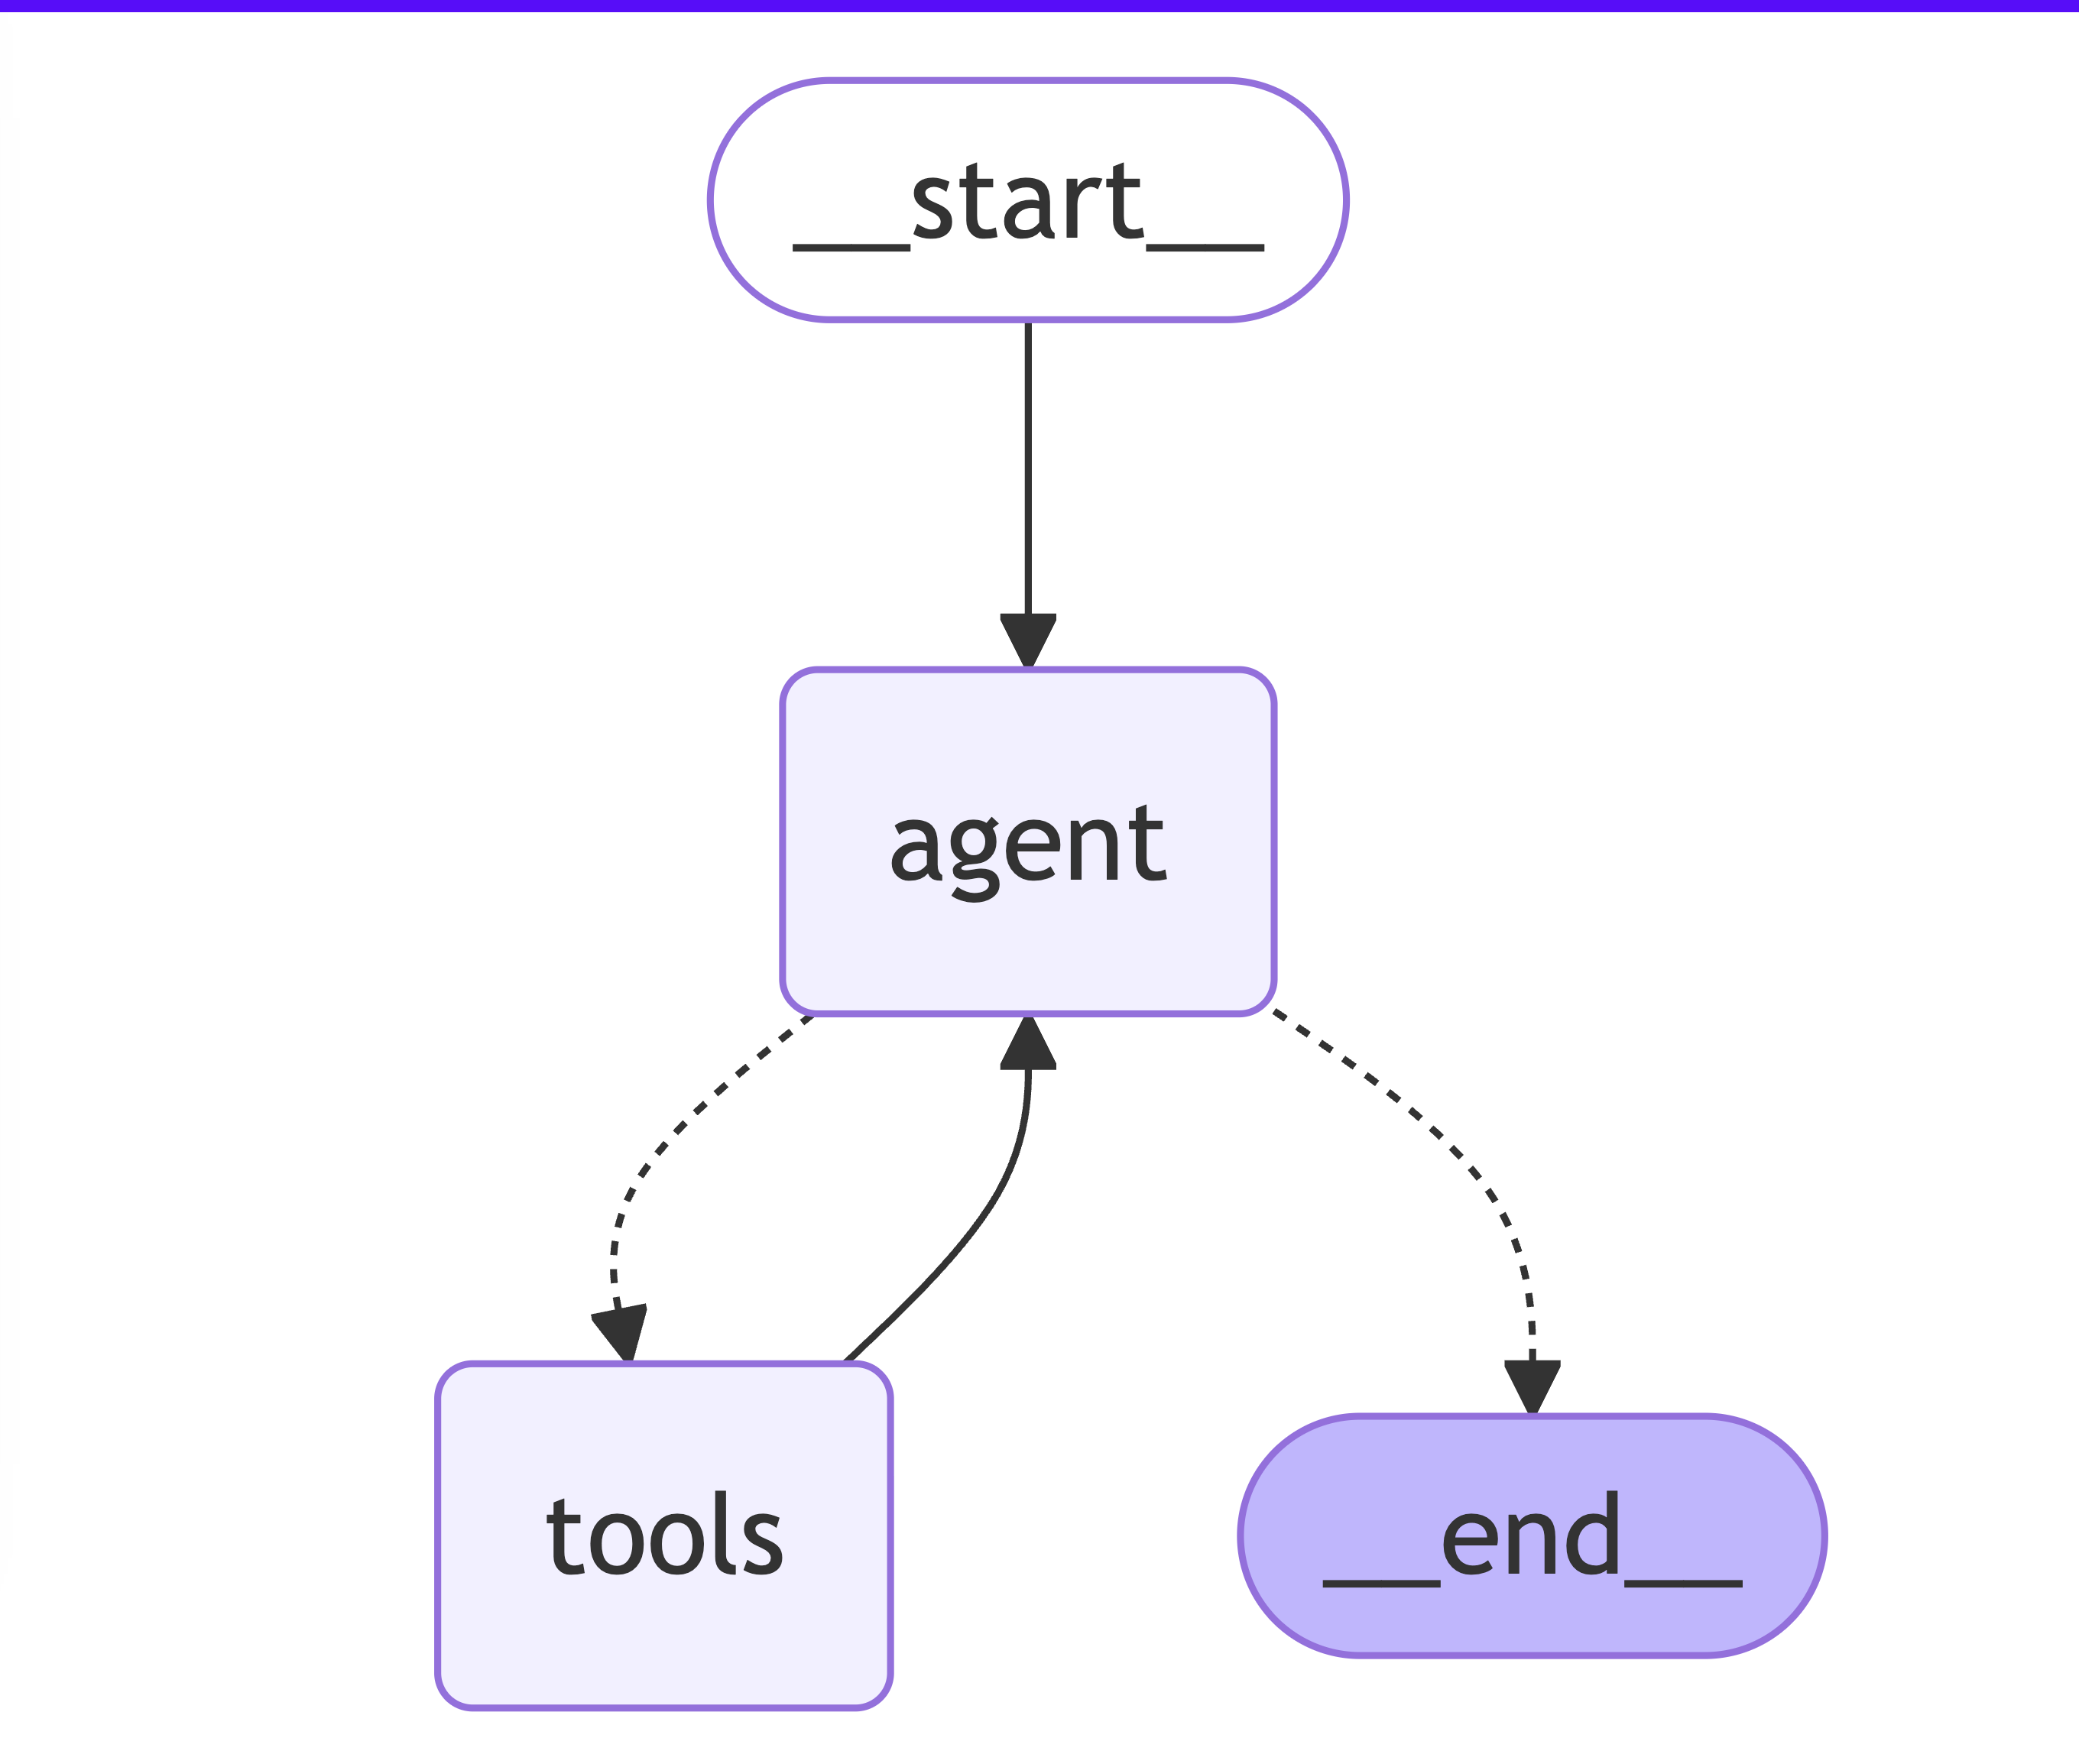
分析一下下面的流程:
- 我们定义了一个
getWeather的工具,这个工具会根据输入的 location 返回天气信息; - 使用 OpenAI 的 gpt-3.5-turbo LLM模型,作为agent Node;
- 用户 输入
what is the weather in SF - 先经过 agent node ; 得到AI Message; 即获取到定位信息为 San Francisco
- 然后经过 tools node; 触发
getWeather工具,传入参数为 San Francisco;最终得到天气信息为 It's 60 degrees and foggy. - 由于 edge 定义,tool 执行后,下一个为 agent , 将工具的结果返回给 LLM 模型,触发 LLM 模型的第二次调用
- 此时 LLM 模型的输入为 It's 60 degrees and foggy. LLM 结合上下文信息,得到最终的结果为
The weather in San Francisco is currently 60 degrees and foggy.
export async function main() {
    // 手动顶一个tool
  const getWeather = tool(
    input => {
      if (["sf", "san francisco"].includes(input.location.toLowerCase())) {
        return "It's 60 degrees and foggy.";
      } else {
        return "It's 90 degrees and sunny.";
      }
    },
    {
      name: "get_weather",
      description: "Call to get the current weather.",
      schema: z.object({
        location: z.string().describe("Location to get the weather for.")
      })
    }
  );

  const tools = [getWeather];
  const modelWithTools = new ChatOpenAI({
    model: "gpt-3.5-turbo",
    temperature: 0,
    maxTokens: 600
  }).bindTools(tools);

  // 工具的集合
  const toolNodeForGraph = new ToolNode(tools);

  const shouldContinue = (state: typeof MessagesAnnotation.State) => {
    const { messages } = state;
    const lastMessage = messages[messages.length - 1];
    // 如果AI Message 里有 tool_calls,就进入 tools 节点 去处理
    if ("tool_calls" in lastMessage && Array.isArray(lastMessage.tool_calls) && lastMessage.tool_calls?.length) {
      return "tools";
    }
    return "__end__";
  };

  const callModel = async (state: typeof MessagesAnnotation.State) => {
    const { messages } = state;
    const response = await modelWithTools.invoke(messages);
    return { messages: response };
  };

  const graph = new StateGraph(MessagesAnnotation)
    .addNode("agent", callModel)
    .addNode("tools", toolNodeForGraph)
    .addEdge("__start__", "agent")
    .addConditionalEdges("agent", shouldContinue)
    .addEdge("tools", "agent")
    .compile();

  const inputs = {
    messages: [{ role: "user", content: "what is the weather in SF?" }]
  };

  const graphImg =( await graph.getGraphAsync())?.drawMermaid()
  console.log('=======merchantid=====start==');

  console.log(graphImg);

  console.log('=======merchantid=====end==');

  const stream = await graph.stream(inputs, {
    streamMode: "values"
  });

  for await (const { messages } of stream) {
    console.log(messages);
  }
  // Returns the messages in the state at each step of execution
}
下面是输出
  [
    // 第一步:用户输入
    HumanMessage {
      "id": "94b78bd3-42cb-4489-84c9-50bf5766eaa8",
      "content": "what is the weather in SF?",
      "additional_kwargs": {},
      "response_metadata": {}
    },
      // 第二步:基于 LLM 得到返回的 AI Message; 即获取到定位信息为 San Francisco

    AIMessage {
      "id": "chatcmpl-BCmEAklWcybBrHURQsDspoY8uGBqv",
      "content": "",
      "additional_kwargs": {
        "tool_calls": [
          {
            "id": "call_gqkKyGeA2md2fWWKEh6uekpf",
            "type": "function",
            "function": "[Object]"
          }
        ]
      },
      "response_metadata": {
        "tokenUsage": {
          "promptTokens": 61,
          "completionTokens": 16,
          "totalTokens": 77
        },
        "finish_reason": "tool_calls",
        "model_name": "gpt-3.5-turbo-0125"
      },
      "tool_calls": [
        {
          "name": "get_weather",
          "args": {
            "location": "San Francisco"
          },
          "type": "tool_call",
          "id": "call_gqkKyGeA2md2fWWKEh6uekpf"
        }
      ],
      "invalid_tool_calls": [],
      "usage_metadata": {
        "output_tokens": 16,
        "input_tokens": 61,
        "total_tokens": 77,
        "input_token_details": {
          "audio": 0,
          "cache_read": 0
        },
        "output_token_details": {
          "audio": 0,
          "reasoning": 0
        }
      }
    },
        //  第三步:调用 getWeather 工具,获取天气信息
    ToolMessage {
      "id": "78e84fdc-6697-4071-b439-2679bdb4343d",
      "content": "It's 60 degrees and foggy.",
      "name": "get_weather",
      "additional_kwargs": {},
      "response_metadata": {},
      "tool_call_id": "call_gqkKyGeA2md2fWWKEh6uekpf"
    },
        // 第四步:由于edge 定义,tool 执行后,下一个为agenet , 将工具的结果返回给 LLM 模型,触发 LLM 模型的第二次调用
    AIMessage {
      "id": "chatcmpl-BCmEBCY6CzVIME25oFfXR9MTS5Vbl",
      "content": "The weather in San Francisco is currently 60 degrees and foggy.",
      "additional_kwargs": {},
      "response_metadata": {
        "tokenUsage": {
          "promptTokens": 93,
          "completionTokens": 16,
          "totalTokens": 109
        },
        "finish_reason": "stop",
        "model_name": "gpt-3.5-turbo-0125"
      },
      "tool_calls": [],
      "invalid_tool_calls": [],
      "usage_metadata": {
        "output_tokens": 16,
        "input_tokens": 93,
        "total_tokens": 109,
        "input_token_details": {
          "audio": 0,
          "cache_read": 0
        },
        "output_token_details": {
          "audio": 0,
          "reasoning": 0
        }
      }
    }
  ]
# 使用 createReactAgent 实现简单的天气查询
createReactAgent 已经将 ToolNode + LLM 的实现封装成了一个方法,我们只需要传入工具列表,就可以创建一个 Agent 应用。 简单而言:createReactAgent 内置了 ToolNode、StateGraph(Node/Edge/Annotation)、compile
# createReactAgent 源码
# 实现天气查询
和上面手动编写 ToolNode+Agent 一样的效果和输出;但代码量减少了很多
import { StateGraph, MessagesAnnotation } from "@langchain/langgraph";
import { createReactAgent, ToolNode } from "@langchain/langgraph/prebuilt";
import { tool } from "@langchain/core/tools";
import { z } from "zod";
import { ChatOpenAI } from "@langchain/openai";

export async function main() {
  // 手动顶一个tool
  const getWeather = tool(
    input => {
      if (["sf", "san francisco"].includes(input.location.toLowerCase())) {
        return "It's 60 degrees and foggy.";
      } else {
        return "It's 90 degrees and sunny.";
      }
    },
    {
      name: "get_weather",
      description: "Call to get the current weather.",
      schema: z.object({
        location: z.string().describe("Location to get the weather for.")
      })
    }
  );

  const tools = [getWeather];
  const agent = createReactAgent({
    llm: new ChatOpenAI({
      temperature: 0,
      model: "gpt-3.5-turbo",
      maxTokens: 600
    }),
    tools: tools
  });

  const inputs = {
    messages: [{ role: "user", content: "what is the weather in SF?" }]
  };

  const graph = await agent.getGraphAsync();
  const graphImg = graph?.drawMermaid();
  console.log(graphImg);
  const stream = await agent.stream(inputs, {
    streamMode: "values"
  });

  for await (const { messages } of stream) {
    console.log(messages);
  }
  // Returns the messages in the state at each step of execution
}
# 使用 createReactAgent 实现多workflow
import { createReactAgent, ToolNode } from "@langchain/langgraph/prebuilt";
import { tool } from "@langchain/core/tools";
import { z } from "zod";
import { ChatOpenAI } from "@langchain/openai";
import { Annotation, StateGraph, END, START } from "@langchain/langgraph";

async function getDistanceFromChina(location: string) {
  // 手动顶一个tool
  const getDistance = tool(
    input => {
      if (input.location.toLowerCase().includes("san francisco")) {
        // 这里可以使用高德的 MCP server 获取距离
        return "It's 1000 km";
      } else {
        return "It's 0 km";
      }
    },
    {
      name: "get_distance",
      description: "Call to get the distance from the location to Chengdu China.",
      schema: z.object({
        location: z.string().describe("Current Location to get the distance for.")
      })
    }
  );

  const tools = [getDistance];
  const agent = createReactAgent({
    llm: new ChatOpenAI({
      temperature: 0,
      model: "gpt-3.5-turbo",
      maxTokens: 600
    }),
    tools: tools,
    prompt: ""
  });

  const inputs = {
    messages: [{ role: "user", content: `what is the Distance from ${location} to Chengdu, China` }]
  };

  const graph = await agent.getGraphAsync();
  const graphImg = graph?.drawMermaid();

  const stream = await agent.stream(inputs, {
    streamMode: "values",
    // subgraphs: true
  });

  let result = "";

  for await (const { messages } of stream) {
    console.log("response= ", messages[messages.length - 1]?.content);

    result = messages[messages.length - 1]?.content;
  }
  // 只返回最后的输出
  return result;
}

async function getWether(location: string) {
  // 手动顶一个tool
  const getWeather = tool(
    input => {
      if (["sf", "san francisco"].includes(input.location.toLowerCase())) {
        return "It's 60 degrees and foggy.";
      } else {
        return "It's 90 degrees and sunny.";
      }
    },
    {
      name: "get_weather",
      description: "Call to get the current weather.",
      schema: z.object({
        location: z.string().describe("Location to get the weather for.")
      })
    }
  );

  const tools = [getWeather];
  const agent = createReactAgent({
    llm: new ChatOpenAI({
      temperature: 0,
      model: "gpt-3.5-turbo",
      maxTokens: 600
    }),
    tools: tools
  });

  const inputs = {
    messages: [{ role: "user", content: `what is the weather in ${location}` }]
  };

  const graph = await agent.getGraphAsync();
  const graphImg = graph?.drawMermaid();

  const stream = await agent.stream(inputs, {
    streamMode: "values",
    // subgraphs: true
  });

  let result = "";

  for await (const { messages } of stream) {
    result = messages[messages.length - 1]?.content;
  }
  // 只返回最后的输出
  return result;
}
export async function main() {


  const StateAnnotation = Annotation.Root({
    location: Annotation<string>(),
    messages: Annotation<string[]>({
      default: () => [],
      reducer: (current, updated) => {
        return Array.from(new Set(current.concat(updated)));
      }
    })
  });

  // 创建工作流
  const workflow = new StateGraph(StateAnnotation);
  workflow.addNode("weather", async state => {
    const weather = await getWether(state.location);
    return {
      messages: [weather]
    };
  });
  workflow.addNode("distance", async state => {
    const weather = await getDistanceFromChina(state.location);
    return {
      messages: [weather]
    };
  });
  workflow.addEdge(START, "weather");
  workflow.addEdge(START, "distance");

  workflow.addEdge("weather", END);
  workflow.addEdge("distance", END);
  const graph = await workflow.compile();
  const graphStructure = await graph.getGraphAsync();
  const graphImg = graphStructure?.drawMermaid();
  console.log("=======merchantid=====start==");
  console.log(graphImg);
  console.log("=======merchantid=====end==");

  const stream = await graph.stream(
    { location: "SF" },
    {
      streamMode: "values",
    }
  );

  let result = "";

  for await (const { messages } of stream) {
    result = messages;
  }
  console.log("=======result=========");

  console.log(result);
}
# 使用 StateGraph 实现单 workflow调用多agent+tools
import { createReactAgent, ToolNode } from "@langchain/langgraph/prebuilt";
import { tool } from "@langchain/core/tools";
import { z } from "zod";
import { ChatOpenAI } from "@langchain/openai";
import { Annotation, StateGraph, END, START, MessagesAnnotation, messagesStateReducer, Command } from "@langchain/langgraph";
import { BaseMessage, HumanMessage, isAIMessage, ToolMessage } from "@langchain/core/messages";

function getDistanceFromChina(location: string) {
  const DistanceStateAnnotation = Annotation.Root({
    distanceMessages: Annotation<BaseMessage[]>({
      default: () => [
        new HumanMessage({
          content: `what is the Distance from ${location} to Chengdu, China`
        })
      ],
      reducer: messagesStateReducer
    })
  });

  // 手动顶一个tool
  const getDistance = tool(
    async (input, config) => {
      if (input.location.toLowerCase().includes("san francisco")) {
        // 这里可以使用高德的 MCP server 获取距离
        return new Command({
          update: {
            distanceMessages: [
              new ToolMessage({
                content: "It's 1000 km",
                tool_call_id: config.toolCall.id
              })
            ]
          }
        });
      } else {
        /**
         * 注意!!! 如果是由Agent 调用的 并行任务,这里的返回值需要使用 Command 完成,不能直接返回一个 字符串,否则会报错
         */
        return new Command({
          update: {
            distanceMessages: [
              new ToolMessage({
                content: "It's 0 km",
                tool_call_id: config.toolCall.id
              })
            ]
          }
        });
      }
    },
    {
      name: "get_distance",
      description: "Call to get the distance from the location to Chengdu China.",
      schema: z.object({
        location: z.string().describe("Current Location to get the distance for.")
      })
    }
  );

  const tools = [getDistance];
  const modelWithTools = new ChatOpenAI({
    model: "gpt-3.5-turbo",
    temperature: 0,
    maxTokens: 600
  }).bindTools(tools);

  // 工具的集合
  const toolNodeForGraph = new ToolNode(tools);

  const shouldContinue = (state: typeof DistanceStateAnnotation.State) => {
    const { distanceMessages = [] } = state;
    const messages = distanceMessages;

    const lastMessage = messages[messages.length - 1];
    if (isAIMessage(lastMessage) && (!lastMessage.tool_calls || lastMessage.tool_calls.length === 0)) {
      return END;
    } else {
      return "continue";
    }
  };

  const callModel = async (state: typeof DistanceStateAnnotation.State) => {
    const { distanceMessages } = state;

    const response = await modelWithTools.invoke(distanceMessages);
    // response.additional_kwargs["message_type"] = "distance";

    return { distanceMessages: response };
  };
  return {
    callModel,
    toolNodeForGraph,
    shouldContinue,
    DistanceStateAnnotation
  };
}

function getWether(location: string) {
  const WeatherStateAnnotation = Annotation.Root({
    weatherMessages: Annotation<BaseMessage[]>({
      default: () => [
        new HumanMessage({
          content: `what is the weather in ${location}`
        })
      ],
      reducer: (current, updated) => {
        return Array.from(new Set(current.concat(updated)));
      }
    })
  });

  // 手动顶一个tool
  const getWeather = tool(
    async (input, config) => {
      if (["sf", "san francisco"].includes(input.location.toLowerCase())) {
        /**
         * 注意!!! 如果是由Agent 调用的 并行任务,这里的返回值需要使用 Command 完成,不能直接返回一个 字符串,否则会报错
         */
        return new Command({
          update: {
            weatherMessages: [
              new ToolMessage({
                content: "It's 60 degrees and foggy.",
                tool_call_id: config.toolCall.id
              })
            ]
          }
        });
      } else {
        return new Command({
          update: {
            weatherMessages: [
              new ToolMessage({
                content: "It's 90 degrees and sunny.",
                tool_call_id: config.toolCall.id
              })
            ]
          }
        });
      }
    },
    {
      name: "get_weather",
      description: "Call to get the current weather.",
      schema: z.object({
        location: z.string().describe("Location to get the weather for.")
      })
    }
  );
  const tools = [getWeather];
  const modelWithTools = new ChatOpenAI({
    model: "gpt-3.5-turbo",
    temperature: 0,
    maxTokens: 600
  }).bindTools(tools);

  // 工具的集合
  const toolNodeForGraph = new ToolNode(tools);
  const shouldContinue = (state: typeof WeatherStateAnnotation.State) => {
    const { weatherMessages } = state;
    const messages = weatherMessages;

    const lastMessage = messages[messages.length - 1];
    if (isAIMessage(lastMessage) && (!lastMessage.tool_calls || lastMessage.tool_calls.length === 0)) {
      console.log("===weather===lastMessage===== END");

      return END;
    } else {
      return "continue";
    }
  };

  const callModel = async (state: typeof WeatherStateAnnotation.State) => {
    const { weatherMessages } = state;
    const messages = weatherMessages;
    const response = await modelWithTools.invoke(messages);
    // response.additional_kwargs["message_type"] = "wether";
    return { weatherMessages: response };
  };

  return {
    callModel,
    toolNodeForGraph,
    shouldContinue,
    WeatherStateAnnotation
  };
}
export async function main() {
  const location = "SF";

  const weather = getWether(location);
  const distance = getDistanceFromChina(location);

  const StateAnnotation = Annotation.Root({
    location: Annotation<string>(),
    ...weather.WeatherStateAnnotation.spec,
    ...distance.DistanceStateAnnotation.spec,
    result: Annotation<string>()
  });

  // 创建工作流
  const workflow = new StateGraph(StateAnnotation);
  workflow.addNode("weather_agent", weather.callModel);
  /**
   * 注意事项!!!
   * 如果N个ToolNode并行调用,则不能直接使用 callModel 自动调用 tools 的形式
   *   workflow.addNode("weather_tools", weather.toolNodeForGraph);
   * 原因是 ToolNode 源码默认消费的是 state 中的 messages 字段,而实际上是没有这个字段的(因为不同的agent使用不同的message字段存储)
   * 所以需要读取上下文数据后 自定义调用 invoke 方法,并解析出内部的数据
   *
   */
  workflow.addNode("weather_tools", async state => {
    const data: Command[]  = await weather.toolNodeForGraph.invoke(state.weatherMessages);
    //data =  [
    //   Command {
    //     lg_name: 'Command',
    //     lc_direct_tool_output: true,
    //     graph: undefined,
    //     update: { weatherMessages: [Array] },
    //     resume: undefined,
    //     goto: []
    //   }
    // ]
    const merges = data?.map(ele => ele.update?.weatherMessages) || [];
    const weatherMessages: any = [];
    merges.forEach(ele => {
      if (Array.isArray(ele)) {
        weatherMessages.push(...ele);
      }
    });
    return {
      weatherMessages: weatherMessages
    };
  });
  workflow.addNode("distance_agent", distance.callModel);
  workflow.addNode("distance_tools", async state => {
    const data: Command[] = await distance.toolNodeForGraph.invoke(state.distanceMessages);
        //data =  [
    //   Command {
    //     lg_name: 'Command',
    //     lc_direct_tool_output: true,
    //     graph: undefined,
    //     update: { distanceMessages: [Array] },
    //     resume: undefined,
    //     goto: []
    //   }
    // ]
    const merges = data?.map(ele => ele.update?.distanceMessages) || [];
    const messages: any = [];
    merges.forEach(ele => {
      if (Array.isArray(ele)) {
        messages.push(...ele);
      }
    });
    return {
      distanceMessages: messages
    };
  });

  workflow.addNode("messgae_wrapper", state => {
    return {
      result:
        state.weatherMessages[state.weatherMessages.length - 1].content +
        "\n" +
        state.distanceMessages[state.distanceMessages.length - 1].content
    };
  });

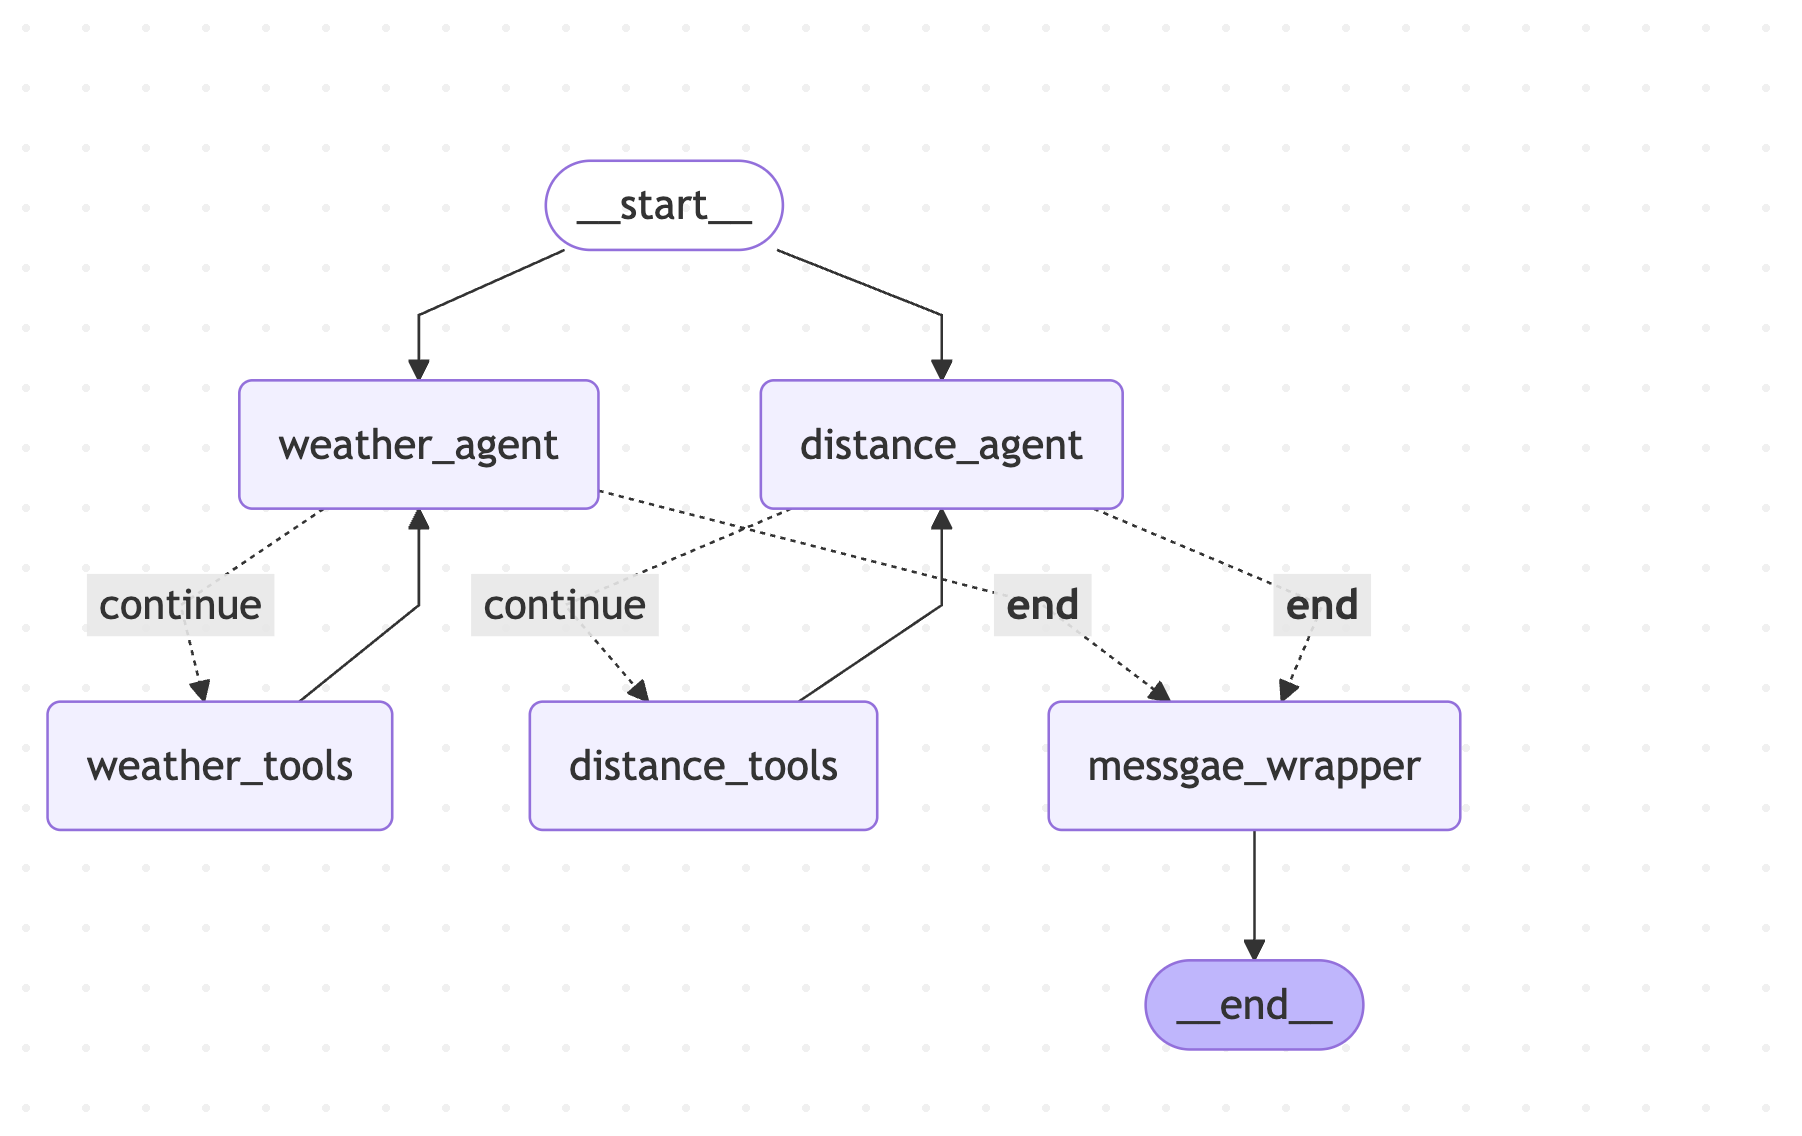
  workflow.addEdge(START, "weather_agent");
  workflow.addEdge(START, "distance_agent");

  workflow.addEdge("weather_tools", "weather_agent");

  workflow.addConditionalEdges("weather_agent", weather.shouldContinue, {
    continue: "weather_tools",
    [END]: "messgae_wrapper"
  });

  workflow.addEdge("distance_tools", "distance_agent");
  workflow.addConditionalEdges("distance_agent", distance.shouldContinue, {
    continue: "distance_tools",
    [END]: "messgae_wrapper"
  });

  workflow.addEdge("messgae_wrapper", END);

  const graph = await workflow.compile();
  const graphStructure = await graph.getGraphAsync();
  const graphImg = graphStructure?.drawMermaid();
  console.log("=======merchantid=====start==");
  console.log(graphImg);
  console.log("=======merchantid=====end==");

  const stream = await graph.stream(
    {
      location
    },
    {
      streamMode: "values"
    }
  );

  let res = "";

  for await (const state of stream) {
    res = state.result;
    // res =
    //   state.weatherMessages[state.weatherMessages.length - 1].content +
    //   "\n" +
    //   state.distanceMessages[state.distanceMessages.length - 1].content;
    // console.log("distanceMessages====== ", distanceMessages);
    // console.log("weatherMessages====== ", weatherMessages);
  }
  // console.log("=======result=========");

  console.log(res);
}
- 本文链接: https://mrgaogang.github.io/ai/langgraph/LangGraph%E4%BD%BF%E7%94%A8.html
- 版权声明: 本博客所有文章除特别声明外,均采用 CC BY-SA 4.0 许可协议。转载请注明出处!
