
技术咨询、项目合作、广告投放、简历咨询、技术文档下载
点击这里 联系博主
# 非完全指南之: 使用代码方式编写微信首页
前面学习了 TableView,Controller,UINavigationCOntroller 和 UITabBarController 的时候,现在我们来使用以上几种来实现微信的首页。
编写之前,我们先来看一下整个微信的 UI 框架结构:
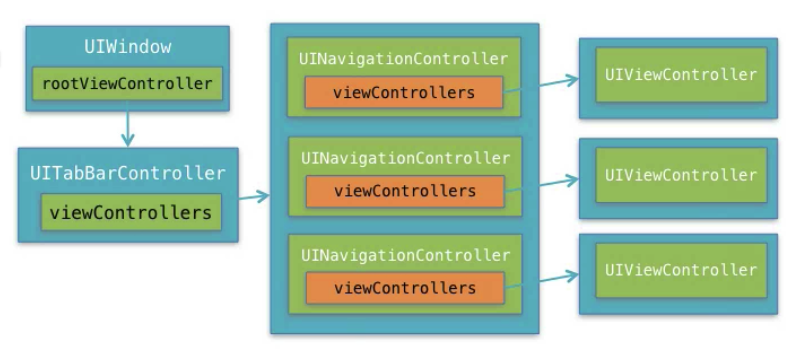
- 最外层是一个 UITabBarController,
- 每一个 Controller 外层是一个 UINavigationCOntroller 包裹着;
- 顶部的标签栏使用 UITabBarItem 创建
如果使用 Storyboard 大致效果图如下:
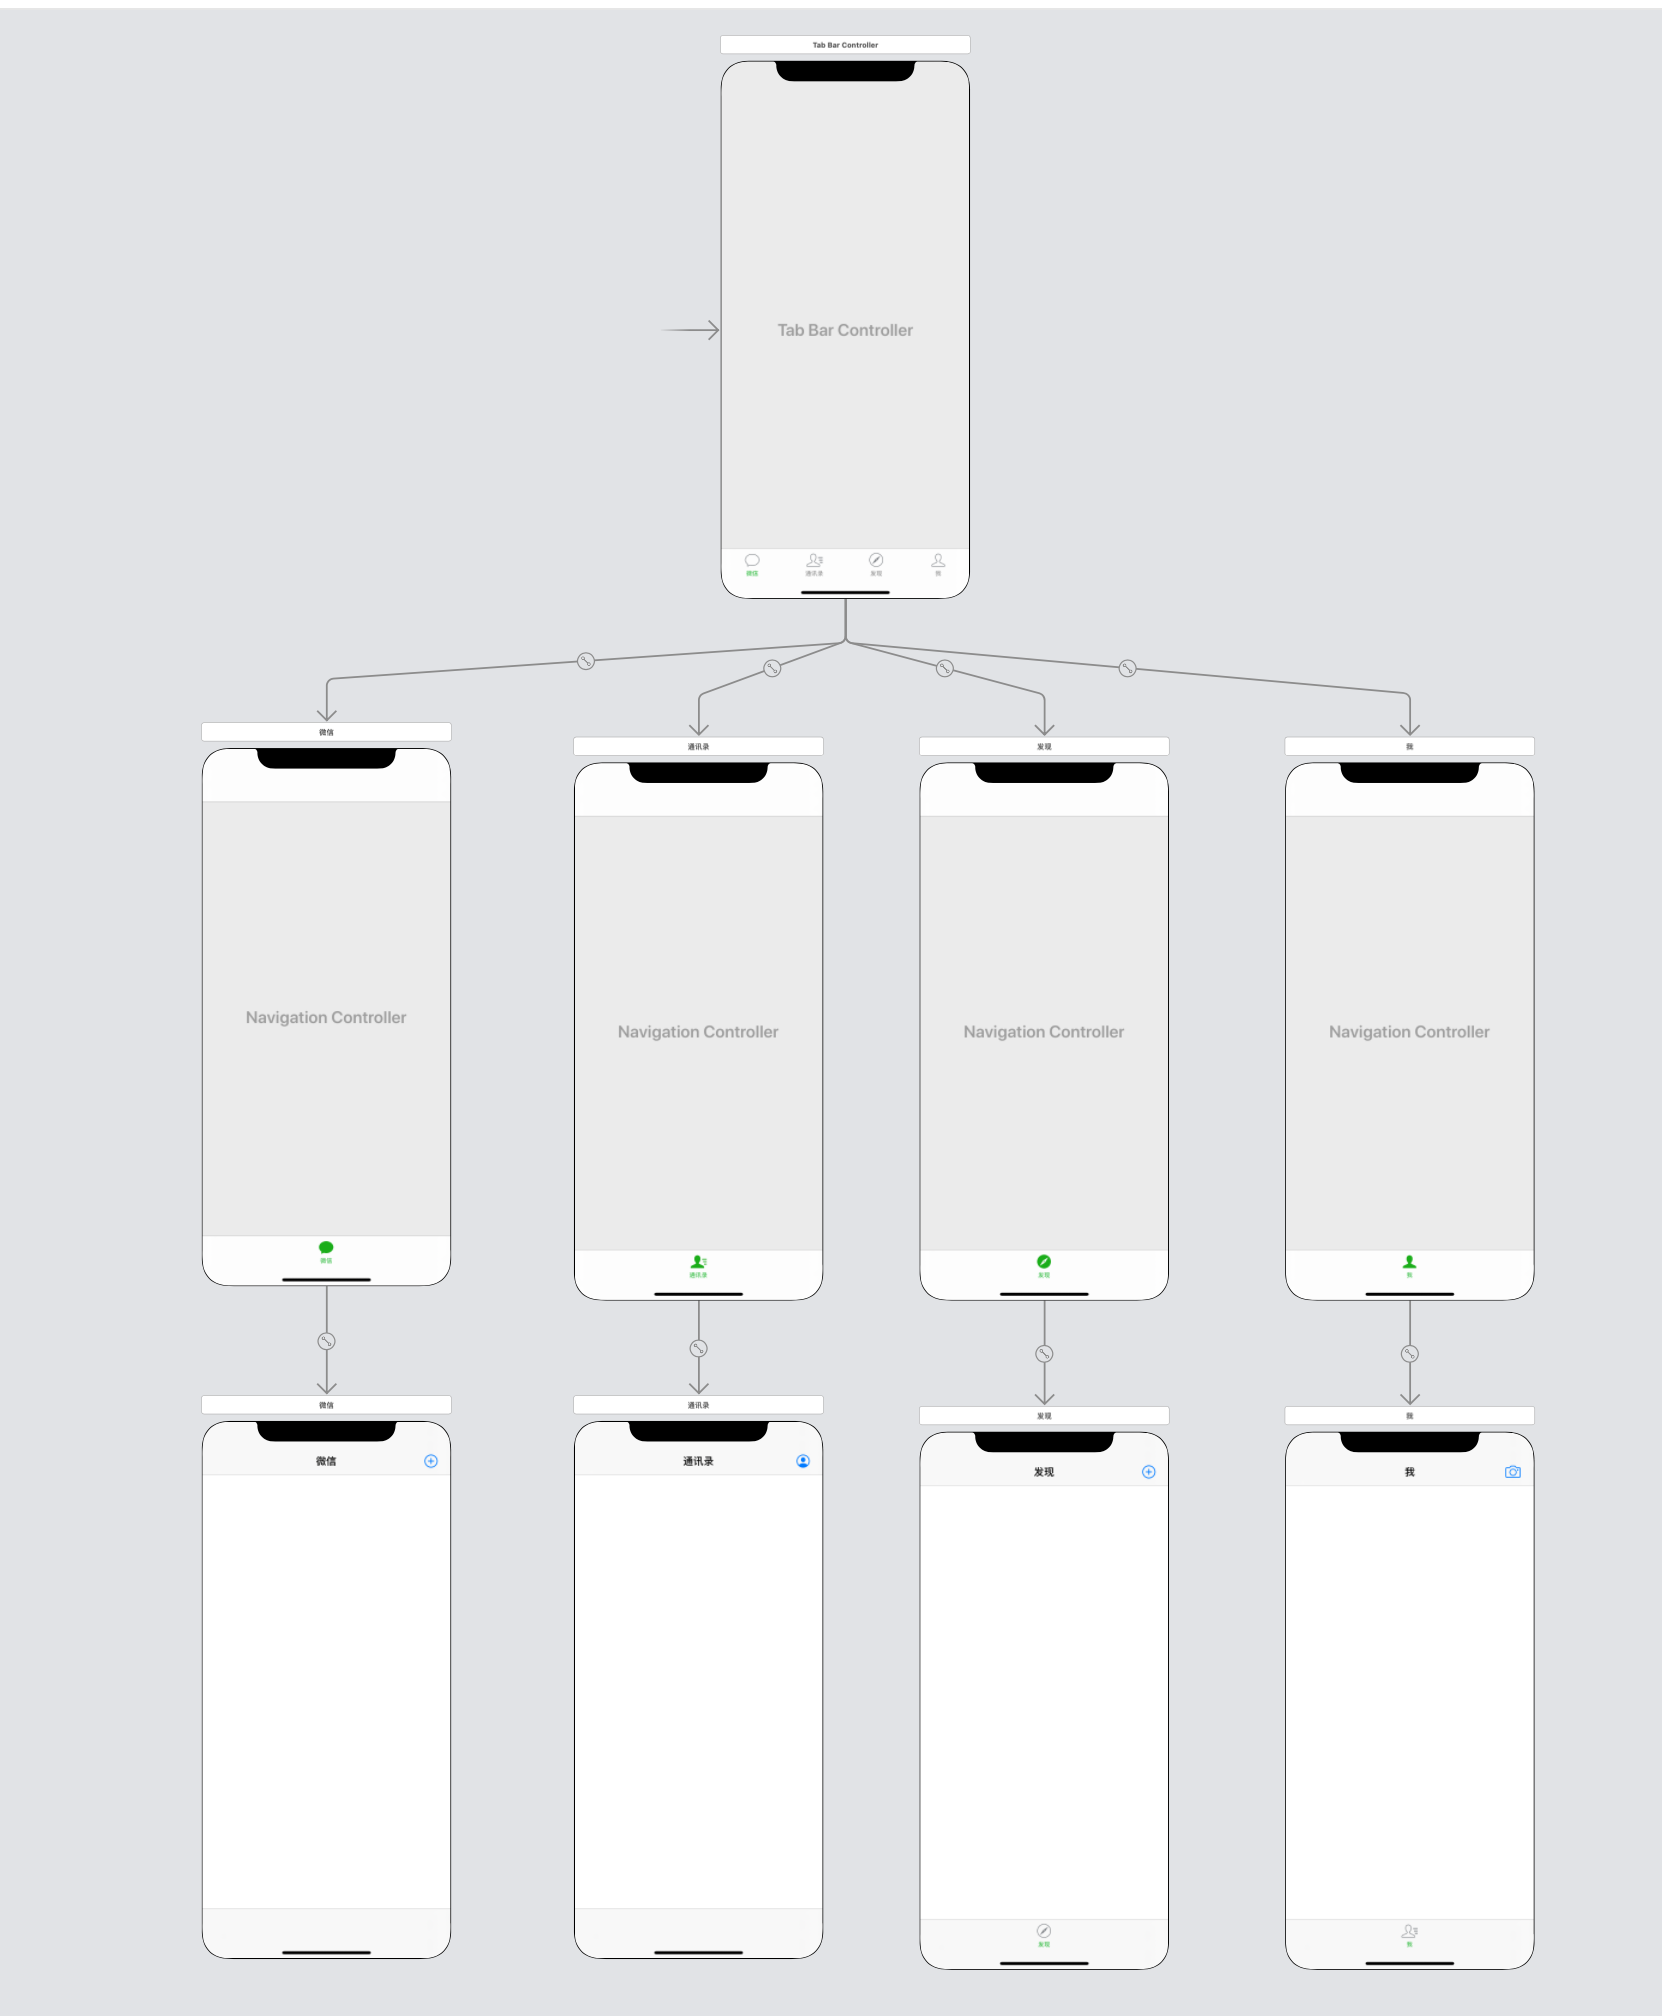
下面我们就来使用代码的方式实现如上的功能:
# 1. 启动使用代码的方式,不使用 Storyboard
删除 Main.storyboard 中的箭头
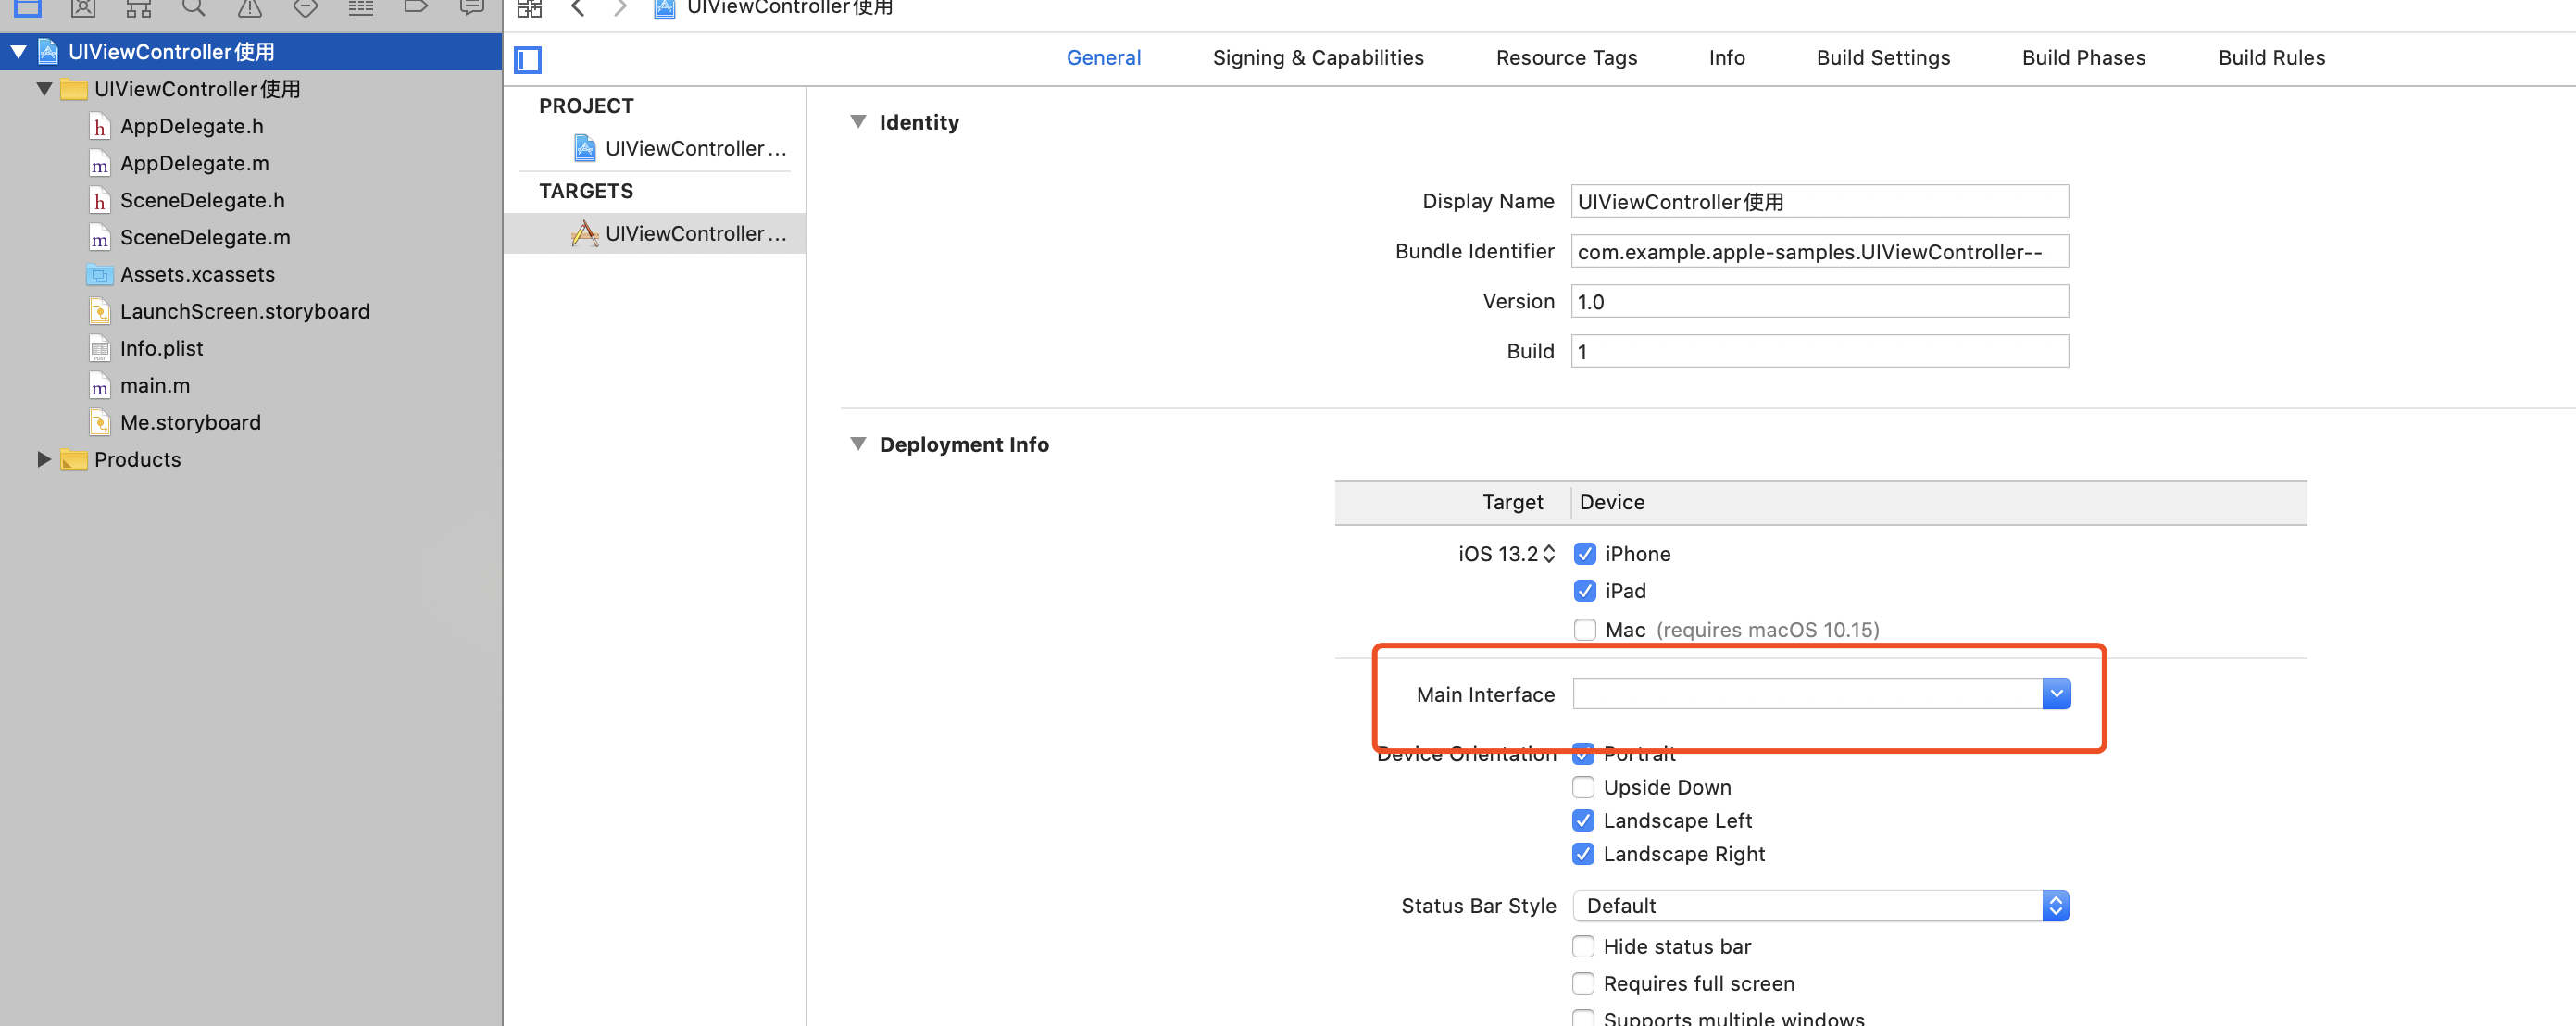
找到项目工程中的 Main Interface,置空
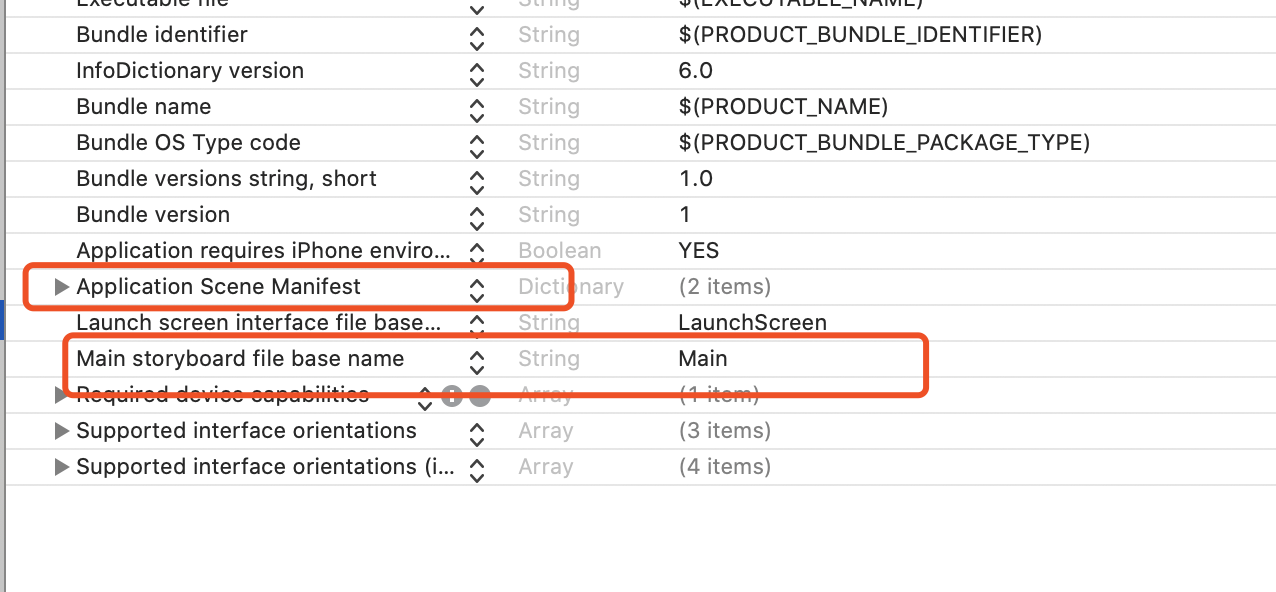
删除 Info,plist 中的信息
- 在
SceneDelegate.m中编写代码启动页面
记得创建一个 WeChatTabBarController 并集成自 TabBarControlle
- (void)scene:(UIScene *)scene willConnectToSession:(UISceneSession *)session options:(UISceneConnectionOptions *)connectionOptions {
    // Override point for customization after application launch.
       self.window = [[UIWindow alloc] initWithWindowScene:(UIWindowScene *)scene];

        self.window.backgroundColor = [UIColor whiteColor];

        WeChatTabBarController *tabTC= [[WeChatTabBarController alloc] init];
        self.window.rootViewController=tabTC;

        [self.window makeKeyAndVisible];

}
# 2. 在 WeChatTabBarController 编写逻辑
其实主要的步骤有如下几个:
创建控制器,包括微信,联系人,发现,我
为每一个控制器设置属性,包括
tabBarItem的标题,选中的图片等等为每一个控制器创建导航控制器
UINavigationController添加导航控制器到标签栏控制器
由于很多代码是类似的,如下做了封装:
///
//  WeChatTabBarController.m
//  代码方式编写微信首页

#import "WeChatTabBarController.h"
#import "WechatViewController.h"
#import "ConnactViewController.h"
#import "FindViewController.h"
#import "MeViewController.h"
@interface WeChatTabBarController ()

- (UIViewController *) createCustomViewController:(NSString *) controller  setTitle :  (NSString *) title setDefault : (NSString *) defaultImage setActive : (NSString *) activeImage;


- (UINavigationController *)createNavigationController:(UIViewController *) controller ;
@end

@implementation WeChatTabBarController

- (void)viewDidLoad {
    [super viewDidLoad];
    // Do any additional setup after loading the view.
    //    1. 创建控制器,包括微信,联系人,发现;为了查看效果,此处就不再次封装了
    WechatViewController *wechat =[self createCustomViewController:@"WechatViewController" setTitle:@"微信" setDefault:@"tabbar_mainframe" setActive:@"tabbar_mainframeHL"];

    ConnactViewController *connects =[self createCustomViewController:@"ConnactViewController" setTitle:@"联系人" setDefault:@"tabbar_contacts" setActive:@"tabbar_contactsHL"];

    FindViewController *find =[self createCustomViewController:@"FindViewController" setTitle:@"发现" setDefault:@"tabbar_discover" setActive:@"tabbar_discoverHL"];

    MeViewController *me =[self createCustomViewController:@"MeViewController" setTitle:@"我" setDefault:@"tabbar_me" setActive:@"tabbar_meHL"];
    //    2. 设置属性

    //    3. 创建导航控制器


    //    4. 添加导航控制器到标签栏控制

    [self addChildViewController:  [self createNavigationController:wechat]];
    [self addChildViewController:  [self createNavigationController:connects]];
    [self addChildViewController:  [self createNavigationController:find]];
    [self addChildViewController:  [self createNavigationController:me]];


}


- (UIViewController *)createCustomViewController:(NSString *)controller setTitle:(NSString *)title setDefault:(NSString *)defaultImage setActive:(NSString *)activeImage{
    //    使用class的方式初始化
    Class class = NSClassFromString(controller);

    UIViewController *vc = [[class alloc] init];
    //    标题文本
    vc.navigationItem.title = title;
    //    底部文字
    vc.tabBarItem.title =title;
    //    默认的图片
    vc.tabBarItem.image = [UIImage imageNamed: defaultImage];
    //    选中的图片
    vc.tabBarItem.selectedImage = [UIImage imageNamed: activeImage];
    //    设置选择的颜色
    [vc.tabBarItem setTitleTextAttributes:@{NSForegroundColorAttributeName:[UIColor colorWithRed:34/255.0 green:172/255.0 blue:37/255.0 alpha:1.0]} forState:UIControlStateHighlighted];
    return vc;
}

/**
 创建导航控制器
 */
- (UINavigationController *)createNavigationController:(UIViewController *)controller{
    UINavigationController *nvc = [[UINavigationController alloc] initWithRootViewController:controller];
    //    设置标题栏背景色
    nvc.navigationBar.barTintColor= [UIColor colorWithRed:15/255.0 green:15/255.0 blue:15/255.0 alpha:15/255.0];
    //    设置标题等,前景颜色
    [nvc.navigationBar setTitleTextAttributes:@{NSForegroundColorAttributeName:UIColor.whiteColor}];
    return nvc;
}

@end
至于每一个控制器独有的属性,我们就在独有的 Controller 中设置即可,比如微信页面右侧有一个加号:
//
//  WechatViewController.m
//  代码方式编写微信首页

#import "WechatViewController.h"

@interface WechatViewController ()

@end

@implementation WechatViewController

- (void)viewDidLoad {
    [super viewDidLoad];
    // Do any additional setup after loading the view.
    self.view.backgroundColor = UIColor.greenColor;
    // 此处使用的系统自带的图片
    self.navigationItem.rightBarButtonItem = [[UIBarButtonItem alloc] initWithBarButtonSystemItem:UIBarButtonSystemItemAdd target:self action:@selector(clickAdd:)];
}

- (void)clickAdd: (id) sender{
    NSLog(@"加号点击了");
}


@end
至于其他的页面,其实是类似的
- 本文链接: https://mrgaogang.github.io/ios/example/wechat/
- 版权声明: 本博客所有文章除特别声明外,均采用 CC BY-SA 4.0 许可协议。转载请注明出处!
