# Vue响应式原理解析


Vue 版本: 2.3.2
首先让我们从最简单的一个实例Vue入手:
const app = new Vue({
  // options  传入一个选项obj.这个obj即对于这个vue实例的初始化
});
通过查阅文档,我们可以知道这个options可以接受:
选项/数据
- data
- props
- propsData(方便测试使用)
- computed
- methods
- watch
选项 / DOM
选项 / 生命周期钩子
选项 / 资源
选项 / 杂项
具体未展开的内容请自行查阅相关文档,接下来让我们来看看传入的选项/数据是如何管理数据之间的相互依赖的。
const app = new Vue({
  el: "#app",
  props: {
    a: {
      type: Object,
      default() {
        return {
          key1: "a",
          key2: {
            a: "b"
          }
        };
      }
    }
  },
  data: {
    msg1: "Hello world!",
    arr: {
      arr1: 1
    }
  },
  watch: {
    a(newVal, oldVal) {
      console.log(newVal, oldVal);
    }
  },
  methods: {
    go() {
      console.log("This is simple demo");
    }
  }
});
我们使用Vue这个构造函数去实例化了一个vue实例app。传入了props, data, watch, methods等属性。在实例化的过程中,Vue提供的构造函数就使用我们传入的options去完成数据的依赖管理,初始化的过程只有一次,但是在你自己的程序当中,数据的依赖管理的次数不止一次。
那Vue的构造函数到底是怎么实现的呢?Vue (opens new window)
// 构造函数
function Vue(options) {
  if (process.env.NODE_ENV !== "production" && !(this instanceof Vue)) {
    warn("Vue is a constructor and should be called with the `new` keyword");
  }
  this._init(options);
}

// 对Vue这个class进行mixin,即在原型上添加方法
// Vue.prototype.* = function () {}
initMixin(Vue);
stateMixin(Vue);
eventsMixin(Vue);
lifecycleMixin(Vue);
renderMixin(Vue);
当我们调用new Vue的时候,事实上就调用的Vue原型上的_init方法.
// 原型上提供_init方法,新建一个vue实例并传入options参数
Vue.prototype._init = function(options?: Object) {
  const vm: Component = this;
  // a uid
  vm._uid = uid++;

  let startTag, endTag;
  // a flag to avoid this being observed
  vm._isVue = true;
  // merge options
  if (options && options._isComponent) {
    // optimize internal component instantiation
    // since dynamic options merging is pretty slow, and none of the
    // internal component options needs special treatment.
    initInternalComponent(vm, options);
  } else {
    // 将传入的这些options选项挂载到vm.$options属性上
    vm.$options = mergeOptions(
      // components/filter/directive
      resolveConstructorOptions(vm.constructor),
      // this._init()传入的options
      options || {},
      vm
    );
  }
  /* istanbul ignore else */
  if (process.env.NODE_ENV !== "production") {
    initProxy(vm);
  } else {
    vm._renderProxy = vm;
  }
  // expose real self
  vm._self = vm; // 自身的实例
  // 接下来所有的操作都是在这个实例上添加方法
  initLifecycle(vm); // lifecycle初始化
  initEvents(vm); // events初始化 vm._events, 主要是提供vm实例上的$on/$emit/$off/$off等方法
  initRender(vm); // 初始化渲染函数,在vm上绑定$createElement方法
  callHook(vm, "beforeCreate"); // 钩子函数的执行, beforeCreate
  initInjections(vm); // resolve injections before data/props
  initState(vm); // Observe data添加对data的监听, 将data转化为getters/setters
  initProvide(vm); // resolve provide after data/props
  callHook(vm, "created"); // 钩子函数的执行, created

  // vm挂载的根元素
  if (vm.$options.el) {
    vm.$mount(vm.$options.el);
  }
};
其中在this._init()方法中调用initState(vm),完成对vm这个实例的数据的监听,也是本文所要展开说的具体内容。
export function initState(vm: Component) {
  // 首先在vm上初始化一个_watchers数组,缓存这个vm上的所有watcher
  vm._watchers = [];
  // 获取options,包括在new Vue传入的,同时还包括了Vue所继承的options
  const opts = vm.$options;
  // 初始化props属性
  if (opts.props) initProps(vm, opts.props);
  // 初始化methods属性
  if (opts.methods) initMethods(vm, opts.methods);
  // 初始化data属性
  if (opts.data) {
    initData(vm);
  } else {
    observe((vm._data = {}), true /* asRootData */);
  }
  // 初始化computed属性
  if (opts.computed) initComputed(vm, opts.computed);
  // 初始化watch属性
  if (opts.watch) initWatch(vm, opts.watch);
}
# initProps
我们在实例化app的时候,在构造函数里面传入的options中有props属性:
    props: {
      a: {
        type: Object,
        default () {
          return {
            key1: 'a',
            key2: {
                a: 'b'
            }
          }
        }
      }
    }
function initProps(vm: Component, propsOptions: Object) {
  // propsData主要是为了方便测试使用
  const propsData = vm.$options.propsData || {};
  // 新建vm._props对象,可以通过app实例去访问
  const props = (vm._props = {});
  // cache prop keys so that future props updates can iterate using Array
  // instead of dynamic object key enumeration.
  // 缓存的prop key
  const keys = (vm.$options._propKeys = []);
  const isRoot = !vm.$parent;
  // root instance props should be converted
  observerState.shouldConvert = isRoot;
  for (const key in propsOptions) {
    // this._init传入的options中的props属性
    keys.push(key);
    // 注意这个validateProp方法,不仅完成了prop属性类型验证的,同时将prop的值都转化为了getter/setter,并返回一个observer
    const value = validateProp(key, propsOptions, propsData, vm);

    // 将这个key对应的值转化为getter/setter
    defineReactive(props, key, value);
    // static props are already proxied on the component's prototype
    // during Vue.extend(). We only need to proxy props defined at
    // instantiation here.
    // 如果在vm这个实例上没有key属性,那么就通过proxy转化为proxyGetter/proxySetter, 并挂载到vm实例上,可以通过app._props[key]这种形式去访问
    if (!(key in vm)) {
      proxy(vm, `_props`, key);
    }
  }
  observerState.shouldConvert = true;
}
接下来看下validateProp(key, propsOptions, propsData, vm)方法内部到底发生了什么。
export function validateProp(
  key: string,
  propOptions: Object, // $options.props属性
  propsData: Object, // $options.propsData属性
  vm?: Component
): any {
  const prop = propOptions[key];
  // 如果在propsData测试props上没有缓存的key
  const absent = !hasOwn(propsData, key);
  let value = propsData[key];
  // 处理boolean类型的数据
  // handle boolean props
  if (isType(Boolean, prop.type)) {
    if (absent && !hasOwn(prop, "default")) {
      value = false;
    } else if (
      !isType(String, prop.type) &&
      (value === "" || value === hyphenate(key))
    ) {
      value = true;
    }
  }
  // check default value
  if (value === undefined) {
    // default属性值,是基本类型还是function
    // getPropsDefaultValue见下面第一段代码
    value = getPropDefaultValue(vm, prop, key);
    // since the default value is a fresh copy,
    // make sure to observe it.
    const prevShouldConvert = observerState.shouldConvert;
    observerState.shouldConvert = true;
    // 将value的所有属性转化为getter/setter形式
    // 并添加value的依赖
    // observe方法的分析见下面第二段代码
    observe(value);
    observerState.shouldConvert = prevShouldConvert;
  }
  if (process.env.NODE_ENV !== "production") {
    assertProp(prop, key, value, vm, absent);
  }
  return value;
}
// 获取prop的默认值
function getPropDefaultValue(
  vm: ?Component,
  prop: PropOptions,
  key: string
): any {
  // no default, return undefined
  // 如果没有default属性的话,那么就返回undefined
  if (!hasOwn(prop, "default")) {
    return undefined;
  }
  const def = prop.default;
  // the raw prop value was also undefined from previous render,
  // return previous default value to avoid unnecessary watcher trigger
  if (
    vm &&
    vm.$options.propsData &&
    vm.$options.propsData[key] === undefined &&
    vm._props[key] !== undefined
  ) {
    return vm._props[key];
  }
  // call factory function for non-Function types
  // a value is Function if its prototype is function even across different execution context
  // 如果是function 则调用def.call(vm)
  // 否则就返回default属性对应的值
  return typeof def === "function" && getType(prop.type) !== "Function"
    ? def.call(vm)
    : def;
}
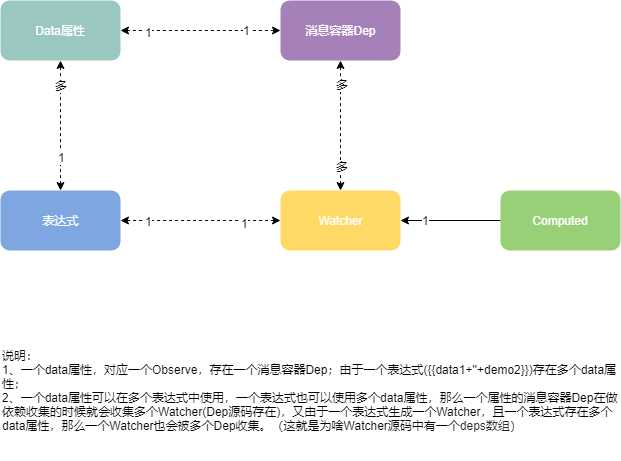
Vue提供了一个observe方法,在其内部实例化了一个Observer类,并返回Observer的实例。每一个Observer实例对应记录了props中这个的default value的所有依赖(仅限object类型),这个Observer实际上就是一个观察者,它维护了一个数组this.subs = []用以收集相关的subs(订阅者)(即这个观察者的依赖)。通过将default value转化为getter/setter形式,同时添加一个自定义__ob__属性,这个属性就对应Observer实例。
说起来有点绕,还是让我们看看我们给的demo里传入的options配置:
    props: {
      a: {
        type: Object,
        default () {
          return {
            key1: 'a',
            key2: {
                a: 'b'
            }
          }
        }
      }
    }
在往上数的第二段代码里面的方法obervse(value),即对{key1: 'a', key2: {a: 'b'}}进行依赖的管理,同时将这个obj所有的属性值都转化为getter/setter形式。此外,Vue还会将props属性都代理到vm实例上,通过vm.a就可以访问到这个属性。
此外,还需要了解下在Vue中管理依赖的一个非常重要的类: Dep
export default class Dep {
  constructor () {
    this.id = uid++
    this.subs = []
  }
  addSub () {...}  // 添加订阅者(依赖)
  removeSub () {...}  // 删除订阅者(依赖)
  depend () {...}  // 检查当前Dep.target是否存在以及判断这个watcher已经被添加到了相应的依赖当中,如果没有则添加订阅者(依赖),如果已经被添加了那么就不做处理
  notify () {...}  // 通知订阅者(依赖)更新
}
在Vue的整个生命周期当中,你所定义的响应式的数据上都会绑定一个Dep实例去管理其依赖。它实际上就是观察者和订阅者联系的一个桥梁。
刚才谈到了对于依赖的管理,它的核心之一就是观察者Observer这个类:
export class Observer {
  value: any;
  dep: Dep;
  vmCount: number; // number of vms that has this object as root $data

  constructor(value: any) {
    this.value = value;
    // dep记录了和这个value值的相关依赖
    this.dep = new Dep();
    this.vmCount = 0;
    // value其实就是vm._data, 即在vm._data上添加__ob__属性
    def(value, "__ob__", this);
    // 如果是数组
    if (Array.isArray(value)) {
      // 首先判断是否能使用__proto__属性
      const augment = hasProto ? protoAugment : copyAugment;
      augment(value, arrayMethods, arrayKeys);
      // 遍历数组,并将obj类型的属性改为getter/setter实现
      this.observeArray(value);
    } else {
      // 遍历obj上的属性,将每个属性改为getter/setter实现
      this.walk(value);
    }
  }

  /**
   * Walk through each property and convert them into
   * getter/setters. This method should only be called when
   * value type is Object.
   */
  // 将每个property对应的属性都转化为getter/setters,只能是当这个value的类型为Object时
  walk(obj: Object) {
    const keys = Object.keys(obj);
    for (let i = 0; i < keys.length; i++) {
      defineReactive(obj, keys[i], obj[keys[i]]);
    }
  }

  /**
   * Observe a list of Array items.
   */
  // 监听array中的item
  observeArray(items: Array<any>) {
    for (let i = 0, l = items.length; i < l; i++) {
      observe(items[i]);
    }
  }
}
walk方法里面调用defineReactive方法:通过遍历这个object的key,并将对应的value转化为getter/setter形式,通过闭包维护一个dep,在getter方法当中定义了这个key是如何进行依赖的收集,在setter方法中定义了当这个key对应的值改变后,如何完成相关依赖数据的更新。但是从源码当中,我们却发现当getter函数被调用的时候并非就一定会完成依赖的收集,其中还有一层判断,就是Dep.target是否存在。
/**
 * Define a reactive property on an Object.
 */
export function defineReactive(
  obj: Object,
  key: string,
  val: any,
  customSetter?: Function
) {
  // 每个属性新建一个dep实例,管理这个属性的依赖
  const dep = new Dep();

  // 或者属性描述符
  const property = Object.getOwnPropertyDescriptor(obj, key);
  // 如果这个属性是不可配的,即无法更改
  if (property && property.configurable === false) {
    return;
  }

  // cater for pre-defined getter/setters
  const getter = property && property.get;
  const setter = property && property.set;

  // 递归去将val转化为getter/setter
  // childOb将子属性也转化为Observer
  let childOb = observe(val);
  Object.defineProperty(obj, key, {
    enumerable: true,
    configurable: true,
    // 定义getter -->reactiveGetter
    get: function reactiveGetter() {
      const value = getter ? getter.call(obj) : val;
      // 定义相应的依赖
      if (Dep.target) {
        // Dep.target.addDep(this)
        // 即添加watch函数
        // dep.depend()及调用了dep.addSub()只不过中间需要判断是否这个id的dep已经被包含在内了
        dep.depend();
        // childOb也添加依赖
        if (childOb) {
          childOb.dep.depend();
        }
        if (Array.isArray(value)) {
          dependArray(value);
        }
      }
      return value;
    },
    // 定义setter -->reactiveSetter
    set: function reactiveSetter(newVal) {
      const value = getter ? getter.call(obj) : val;
      /* eslint-disable no-self-compare */
      if (newVal === value || (newVal !== newVal && value !== value)) {
        return;
      }
      if (setter) {
        setter.call(obj, newVal);
      } else {
        val = newVal;
      }
      // 对得到的新值进行observe
      childOb = observe(newVal);
      // 相应的依赖进行更新
      dep.notify();
    }
  });
}
在上文中提到了Dep类是链接观察者和订阅者的桥梁。同时在Dep的实现当中还有一个非常重要的属性就是Dep.target,它事实就上就是一个订阅者,只有当Dep.target(订阅者)存在的时候,调用属性的getter函数的时候才能完成依赖的收集工作。
Dep.target = null;
const targetStack = [];

export function pushTarget(_target: Watcher) {
  if (Dep.target) targetStack.push(Dep.target);
  Dep.target = _target;
}

export function popTarget() {
  Dep.target = targetStack.pop();
}
那么Vue是如何来实现订阅者的呢?Vue里面定义了一个类: Watcher,在Vue的整个生命周期当中,会有 4 类地方会实例化Watcher:
Vue实例化的过程中有watch选项Vue实例化的过程中有computed计算属性选项Vue原型上有挂载$watch方法: Vue.prototype.$watch,可以直接通过实例调用this.$watch方法Vue生成了render函数,更新视图时
constructor (
    vm: Component,
    expOrFn: string | Function,
    cb: Function,
    options?: Object
  ) {
    // 缓存这个实例vm
    this.vm = vm
    // vm实例中的_watchers中添加这个watcher
    vm._watchers.push(this)
    // options
    if (options) {
      this.deep = !!options.deep
      this.user = !!options.user
      this.lazy = !!options.lazy
      this.sync = !!options.sync
    } else {
      this.deep = this.user = this.lazy = this.sync = false
    }
    this.cb = cb
    this.id = ++uid // uid for batching
    this.active = true
    this.dirty = this.lazy // for lazy watchers
    ....
    // parse expression for getter
    if (typeof expOrFn === 'function') {
      this.getter = expOrFn
    } else {
      this.getter = parsePath(expOrFn)
      if (!this.getter) {
        this.getter = function () {}
      }
    }
    // 通过get方法去获取最新的值
    // 如果lazy为true, 初始化的时候为undefined
    this.value = this.lazy
      ? undefined
      : this.get()
  }
  get () {...}
  addDep () {...}
  update () {...}
  run () {...}
  evaluate () {...}
  run () {...}
Watcher接收的参数当中expOrFn定义了用以获取watcher的getter函数。expOrFn可以有 2 种类型:string或function.若为string类型,首先会通过parsePath方法去对string进行分割(仅支持.号形式的对象访问)。在除了computed选项外,其他几种实例化watcher的方式都是在实例化过程中完成求值及依赖的收集工作:this.value = this.lazy ? undefined : this.get().在Watcher的get方法中:
!!!前方高能
get () {
 // pushTarget即设置当前的需要被执行的watcher
    pushTarget(this)
    let value
    const vm = this.vm
    if (this.user) {
      try {
        // $watch(function () {})
        // 调用this.getter的时候,触发了属性的getter函数
        // 在getter中进行了依赖的管理
        value = this.getter.call(vm, vm)
        console.log(value)
      } catch (e) {
        handleError(e, vm, `getter for watcher "${this.expression}"`)
      }
    } else {
      // 如果是新建模板函数,则会动态计算模板与data中绑定的变量,这个时候就调用了getter函数,那么就完成了dep的收集
      // 调用getter函数,则同时会调用函数内部的getter的函数,进行dep收集工作
      value = this.getter.call(vm, vm)
    }
    // "touch" every property so they are all tracked as
    // dependencies for deep watching
    // 让每个属性都被作为dependencies而tracked, 这样是为了deep watching
    if (this.deep) {
      traverse(value)
    }
    popTarget()
    this.cleanupDeps()
    return value
}
一进入get方法,首先进行pushTarget(this)的操作,此时Vue当中Dep.target = 当前这个watcher,接下来进行value = this.getter.call(vm, vm)操作,在这个操作中就完成了依赖的收集工作。还是拿文章一开始的demo来说,在vue实例化的时候传入了watch选项:
    props: {
      a: {
        type: Object,
        default () {
          return {
            key1: 'a',
            key2: {
                a: 'b'
            }
          }
        }
      }
    },
   watch: {
        a (newVal, oldVal) {
            console.log(newVal, oldVal)
        }
    },
在Vue的initState()开始执行后,首先会初始化props的属性为getter/setter函数,然后在进行initWatch初始化的时候,这个时候初始化watcher实例,并调用get()方法,设置Dep.target = 当前这个watcher实例,进而到value = this.getter.call(vm, vm)的操作。在调用this.getter.call(vm, vm)的方法中,便会访问props选项中的a属性即其getter函数。在a属性的getter函数执行过程中,因为Dep.target已经存在,那么就进入了依赖收集的过程:
if (Dep.target) {
  // Dep.target.addDep(this)
  // 即添加watch函数
  // dep.depend()及调用了dep.addSub()只不过中间需要判断是否这个id的dep已经被包含在内了
  dep.depend();
  // childOb也添加依赖
  if (childOb) {
    childOb.dep.depend();
  }
  if (Array.isArray(value)) {
    dependArray(value);
  }
}
dep是一开始初始化的过程中,这个属性上的dep属性。调用dep.depend()函数:
  depend () {
    if (Dep.target) {
      // Dep.target为一个watcher
      Dep.target.addDep(this)
    }
  }
Dep.target也就刚才的那个watcher实例,这里也就相当于调用了watcher实例的addDep方法: watcher.addDep(this),并将dep观察者传入。在addDep方法中完成依赖收集:
addDep (dep: Dep) {
    const id = dep.id
    if (!this.newDepIds.has(id)) {
      this.newDepIds.add(id)
      this.newDeps.push(dep)
      if (!this.depIds.has(id)) {
        dep.addSub(this)
      }
    }
  }
这个时候依赖完成了收集,当你去修改a属性的值时,会调用a属性的setter函数,里面会执行dep.notify(),它会遍历所有的订阅者,然后调用订阅者上的update函数。
initData过程和initProps类似,具体可参见源码。
# initComputed
以上就是在initProps过程中Vue是如何进行依赖收集的,initData的过程和initProps类似,下来再来看看initComputed的过程.
在computed属性初始化的过程当中,会为每个属性实例化一个watcher:
const computedWatcherOptions = { lazy: true };

function initComputed(vm: Component, computed: Object) {
  // 新建_computedWatchers属性
  const watchers = (vm._computedWatchers = Object.create(null));

  for (const key in computed) {
    const userDef = computed[key];
    // 如果computed为funtion,即取这个function为getter函数
    // 如果computed为非function.则可以单独为这个属性定义getter/setter属性
    let getter = typeof userDef === "function" ? userDef : userDef.get;
    // create internal watcher for the computed property.
    // lazy属性为true
    // 注意这个地方传入的getter参数
    // 实例化的过程当中不去完成依赖的收集工作
    watchers[key] = new Watcher(vm, getter, noop, computedWatcherOptions);

    // component-defined computed properties are already defined on the
    // component prototype. We only need to define computed properties defined
    // at instantiation here.
    if (!(key in vm)) {
      defineComputed(vm, key, userDef);
    }
  }
}
但是这个watcher在实例化的过程中,由于传入了{lazy: true}的配置选项,那么一开始是不会进行求值与依赖收集的: this.value = this.lazy ? undefined : this.get().在initComputed的过程中,Vue会将computed属性定义到vm实例上,同时将这个属性定义为getter/setter。当你访问computed属性的时候调用getter函数:
function createComputedGetter(key) {
  return function computedGetter() {
    const watcher = this._computedWatchers && this._computedWatchers[key];
    if (watcher) {
      // 是否需要重新计算
      if (watcher.dirty) {
        watcher.evaluate();
      }
      // 管理依赖
      if (Dep.target) {
        watcher.depend();
      }
      return watcher.value;
    }
  };
}
在watcher存在的情况下,首先判断watcher.dirty属性,这个属性主要是用于判断这个computed属性是否需要重新求值,因为在上一轮的依赖收集的过程当中,观察者已经将这个watcher添加到依赖数组当中了,如果观察者发生了变化,就会dep.notify(),通知所有的watcher,而对于computed的watcher接收到变化的请求后,会将watcher.dirty = true即表明观察者发生了变化,当再次调用computed属性的getter函数的时候便会重新计算,否则还是使用之前缓存的值。
# initWatch
initWatch的过程中其实就是实例化new Watcher完成观察者的依赖收集的过程,在内部的实现当中是调用了原型上的Vue.prototype.$watch方法。这个方法也适用于vm实例,即在vm实例内部调用this.$watch方法去实例化watcher,完成依赖的收集,同时监听expOrFn的变化。
总结:
以上就是在Vue实例初始化的过程中实现依赖管理的分析。大致的总结下就是:
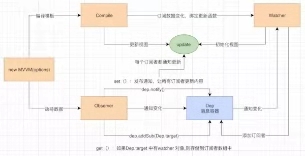
initState的过程中,将props,computed,data等属性通过Object.defineProperty来改造其getter/setter属性,并为每一个响应式属性实例化一个observer观察者。这个observer内部dep记录了这个响应式属性的所有依赖。- 当响应式属性调用
setter函数时,通过dep.notify()方法去遍历所有的依赖,调用watcher.update()去完成数据的动态响应。
这篇文章主要从初始化的数据层面上分析了Vue是如何管理依赖来到达数据的动态响应。下一篇文章来分析下Vue中模板中的指令和响应式数据是如何关联来实现由数据驱动视图,以及数据是如何响应视图变化的。
- 本文链接: https://mrgaogang.github.io/vue/deep/Vue%E5%93%8D%E5%BA%94%E5%BC%8F%E5%8E%9F%E7%90%86%E8%A7%A3%E6%9E%90.html
- 版权声明: 本博客所有文章除特别声明外,均采用 CC BY-SA 4.0 许可协议。转载请注明出处!
